Archives

9 towels this week

I got those 3 log cabin towels hemmed and wet finished. Here’s one in its entirety.

wet finished log cabin towel

I am still quite ambivalent about them. I chose yellow for the solid color because sometime, someplace, I heard that the most common paint color for kitchens is yellow. I think I would have liked them better if I’d chosen blue for the solid. But maybe not. I’m guessing I’ll have these towels for some time.

I also got the 6 bumberet towels woven, hemmed, and wet finished. Here’s the full width so you can see all 14 colors in the warp, with the periwinkle weft.

periwinkle bumberet on loom

I wove each towel with a different weft color.
6 bumberet towels

I surprised myself by picking the pale green as my favorite. I never would have predicted that. But as I said to a friend, I can almost feel the spring breezes coming off that towel.

6 bumberet towels, folded square

This afternoon I mailed off 1 of the log cabin, 2 of the bumberet, and 1 other towel I’d found in my stash to Cazenovia Artisans to augment my display there. I’ve also sold one of those bumberet towels locally.

As soon as I have time I’ll do the glam shots for the other towels and put them up in my Etsy store. Gee, I have so much to put in there! Where does the time go?

Towels to come

log cabin towels

I’ve finished weaving the 3 log cabin towels with yellow and that ‘confetti’ yarn. They’re cut off the loom but no hemming or wet finishing yet. I don’t think I either hate or love them, but I’m reserving judgement until they are wet finished.

I brought 9 towels to Cazenovia, but at least 3 were sold on the first day. They asked me to send more, but when I got home I realized I only had 3 more towels. So I wanted to not only finish those log cabin towels, but also put another towel warp on the loom right away. I decided on bumberet, a structure I’ve been wanting to try for a while.

What, you may ask, is bumberet? Wish I could tell you for sure. I’ve tried getting clear info online, and I’ve found some contradictions. The best I can be tell you is that it’s a 4-shaft structure, is usually very colorful and is (maybe?) somewhat ribbed. I’ve seen a variety of drafts and decided on one that is simple in both threading and treadling.

bumberet weaving draft

Those are not the colors I used…I chose a wide array of blues and greens with a touch of yellow thrown in for good measure.

cones for bumberet towels

This structure is slow to measure. I wind 3 lengths of color A, cut & tie on color B for 3 lengths, cut & tie on color A for 3 lengths. Repeat with 2 new colors. So I never wind more than 3 threads of one color. LOTS of starting and stopping. Here’s bout 1 on the warping mill.

bumberet towels bout 1

I wound that yesterday. Today I wound the other 3 bouts, beamed it all, and threaded 430 heddles and the reed. Tomorrow I’ll start the weaving. It’s a single shuttle weave and a simple treadling pattern, so that should move along smoothly. My plan is to use a different color weft for each towel, assuming I have enough of 6 of the warp colors to do that…I was using up stash (yay!).

More finishing and starting

hand painted silk - 2 views

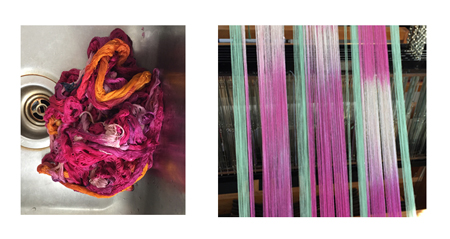
You may have been curious about that last batch of hand painted silk. In the sink you saw that there was yellow in the warp, but in the photo of it being beamed, there was no yellow. What you saw being beamed was the first section I painted, before I added yellow to the mix of colors. Did I mention that I didn’t really measure where I was on the warp when I made that decision? It was a guesstimate. I knew that as I was weaving I might determine that I didn’t guess very well…only time would tell.

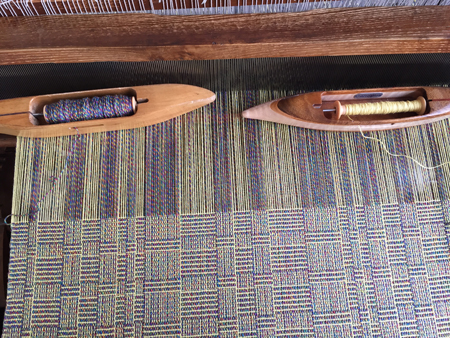
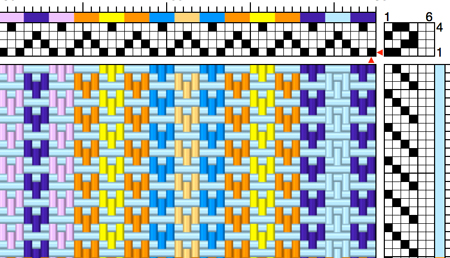
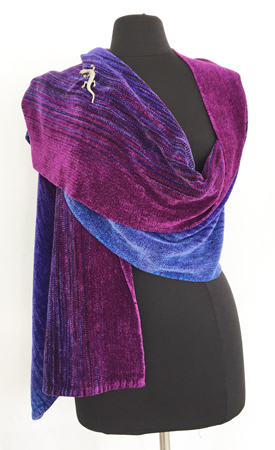
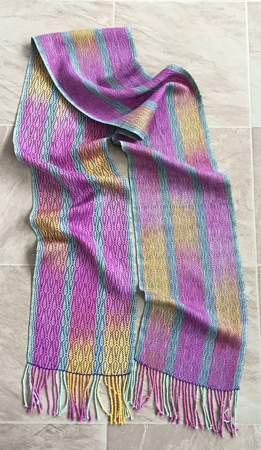
Anyway, I wove the first scarf using a very dark purple weft, in what I call a ‘leaves’ threading and treadling. In this view you can see both sides of the scarf, and see how the purple comes to the foreground or retreats a bit.

hand painted silk, spring leaves

For the second scarf I previewed a few different weft colors, deciding I liked ruby best. I used three strands of ruby tram silk. Tram is the very shiny, super fine silk they used in making kimono. Using three strands together was still finer than the silk in my warp. I kept the same tie up but changed the treadling to a network twill. I’d used this treadling for the hand painted rayon shawls I made a month or two ago.

hand painted silk with ruby tram weft

Although it was more tedious and time consuming to weave with the 3 strands, I loved the way the scarf was turning out. I was merrily weaving along, and oops…before I got to the length I wanted I hit the place where the yellow ended. I decided it would be better to have a scarf that’s 10″ shorter than my usual length than to suddenly stop having yellow in the warp.

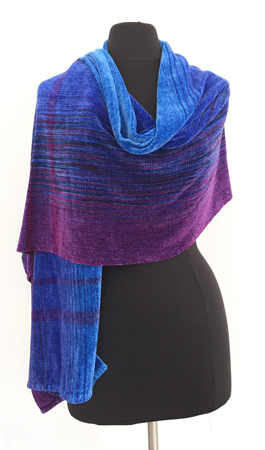
So I previewed a few more weft colors for this last section, the scarf with no yellow in it. I thought I’d use a gold, yellow, or salmon weft, but when I tried them out none tickled my fancy. Instead I chose periwinkle, which happens to be one of my go-to colors. I went back to the treadling for the leaves.

hand painted silk warp with periwinkle weft

Once again you can see how significantly the choice of weft color impacted the overall look of the three scarves, not considering the loss of yellow in the third. I am learning more about color interaction since I started doing hand painting than I did in the several previous years. Who knew that would be such a nice surprise?

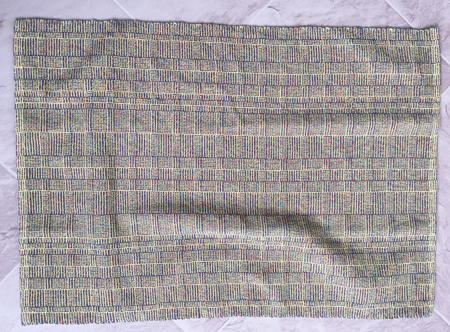
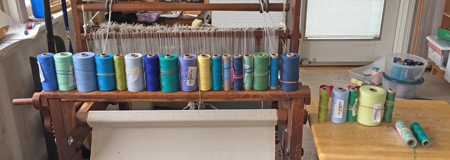
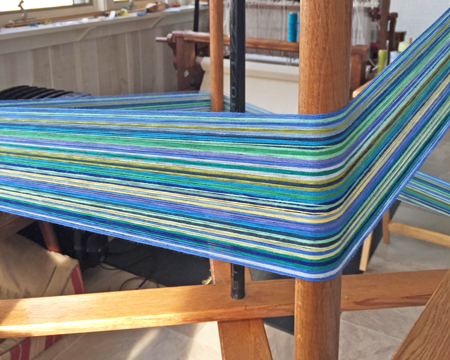
Now I needed to get back to a little stash busting. I found some of what I’ll call confetti colored yarn, in a blend of cotton, rayon and linen in my stash. I paired it with some solid yellow cotton, and measured the threads out for a log cabin weave.

measuring yellow log cabin yarn

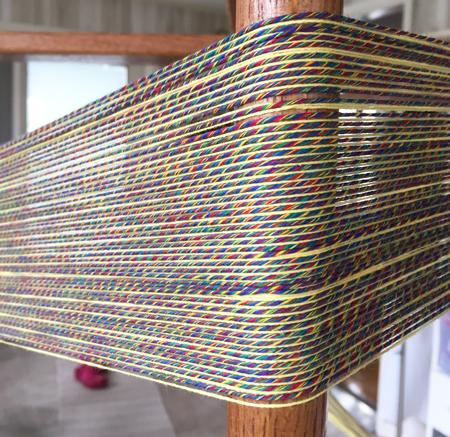
I don’t know if I’ll like it or hate it, but it will probably be one of those two, nothing in between. In addition to the overall colors, the confetti yarn is a thicker grist than the yellow cotton, and that may make it cool to look at or awful. Again, only time will tell.

I only had enough of each of the yarn for three towels, so that’s what I measured for. I won’t have time to get it on the loom till I come back from Cazenovia. Once I start weaving if I really hate it, I can just cut it all off and throw it away. As one of my weaving gurus, Laura Fry, says, it’s much more cost effective to throw away some yarn than to waste a bunch of time. (Certainly my paraphrasing; Laura wording is much better.) Stay tuned to see what it looks like.

Showing — off??

Cazenovia postcard

As I’ve mentioned, for the month of April I’ll be in Cazenovia. Well, I won’t be, but some of my work will. I’ll be the Visiting Artist for the month with the Cazenovia Artisans. Today I’ll be choosing the pieces that will travel there, and using my new labels on them.

One of each of the new shawls and scarves, woven in the last month or two, will go to Cazenovia. The others either are or will be up on my Etsy page as soon as I can squeeze out the time to do that.

Here are those last 2 rayon chenille shawls…Amethyst & Sapphires.

The first one has an amethyst weft.
amethyst & sapphires handwoven rayon chenille shawl

The second has a sapphire weft, with a few amethyst stripes at the ends. This is the one that will go on Etsy.

amethyst & sapphires handwoven rayon chenille shawl, with stripes

Gotta get back to work!

This took HOW long?

an old tag

I haven’t liked my hang tags for a long time. A. Long. Time. I can document 3 years, because that’s when I posted a question on Weavolution in the Professional Weavers group. I’ve tried to remember to look at the tags of other weavers at shows, sometimes forgetting, other times unimpressed with what I saw.

As shown above, my old tags were printed on card stock. Federal law requires that every item is marked with fiber content and care instructions. I had to create tags specifically for every fiber and fiber combo that I used. Invariably I didn’t have the tags I needed when I was preparing for a show and had to make new ones. Then I’d write the size and some kind of title on the tag so that when the item was purchased I might have some clue for my records what it was.

The tags were marginally acceptable on day one, but when the piece got rolled and packed up for the night, the odds that the tag would be wrinkled were high, so it didn’t take long for them to look ratty.

A few months ago I decided I couldn’t wait any longer to upgrade my tags. I talked to a local printer and was pleased that they had a somewhat flexible, durable, non-rippable stock they could print on.

Then I set about designing the new tag. The new stock (called Poli Print) couldn’t be folded well (a good thing) to make a tiny booklet, which was my original vision, so I had to re-design a few times. The tag had to be small enough to look good, have all the information I needed on it for various fibers and care instructions, plus my branding and contact info.

I got them back early this week, and although not perfect, I figure after 3 years they are just fine.

a new tag

I will check the appropriate lines for fiber content and care instructions. I’m betting it won’t be long before I use some fiber that isn’t listed, but I tried to include all the ones I use. Then I’ll still have to hand write the size and title, which I wish I didn’t have to do since I think it detracts from the professional look, but typing that info on small labels (like return address label size) and then sticking them on seems problematic, too, although I may try a few.

People have to be able to see both sides of the tag, so I can’t simply pin them to the piece as I did with the old tags. I spent last night cutting strings for hanging, knotting and trimming, and inserting them in the hole, and got 125 tags done. I cut the strings for another 300 tags, and may do some more knotting, trimming, and inserting tonight. My obsessive nature likes to get things like that done in advance.

Three years — can you believe it?!