Archives

How to measure gradients

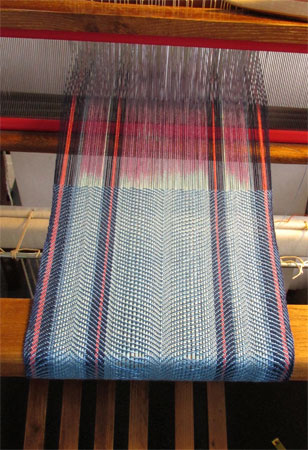
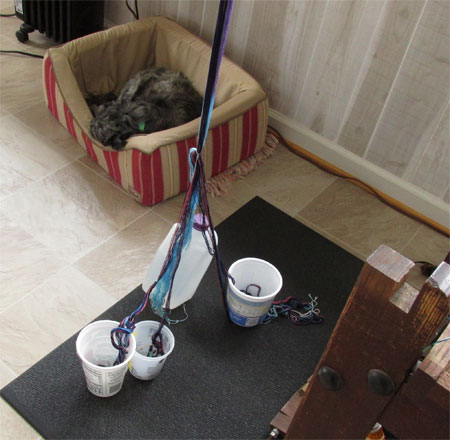
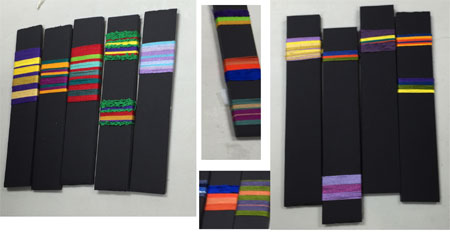
After a somewhat lengthy break, I’m working on my next baby wrap warp. This one is for CT and TS. Instead of taking still shots of my bouts, I thought I’d try a different route this time, showing what is involved in measuring a warp, especially the gradient section. I tried my hand at another video, and although this is my third try, it was nowhere near as tricky as the last one, when I had to figure out how to suspend the tripod over my head.

Note that I mis-spoke in two places. First I said I was using 2 strands of lavender when it was actually magenta. Then I told you I had the incorrect number of threads…you’ll see me count to confirm that I have the number I need; clearly I couldn’t talk and count at the same time. Regardless, I think you’ll find it interesting to see the process. (SO WEIRD! When I preview I see the correct video. When I post I see the prior weaving with sequins video. I’m working on fixing that. Bear with me.)

It’s been a whole week since I last posted. In the meantime I went to a Weaver’s Guild meeting and saw a great presentation on art quilts by an AMAZING quilter, Pat Pauly. I also met with 2 other Guild members who are interested in exploring working toward a Certificate of Excellence with the Handweavers Guild of America. A daunting task, indeed, and I’m not sure if I’ll go all the way…it’s a B.I.G job…some people have spent many hours each week for years to prepare all the needed materials and samples! But I’m confident that no matter how far I proceed down that path, it will be worth it and I’ll learn things.

I went to Rochester’s First Friday, a monthly event focusing on art and artists. It was fun and interesting. I didn’t buy anything this month, but I did gather some business cards from people whose work intrigued or inspired me.

I spent more than 5 hours taking an online Defensive Driving course. I do this every 3 years to get a discount on my car insurance, and to remind me of things I need to pay attention to when I’m behind the wheel.

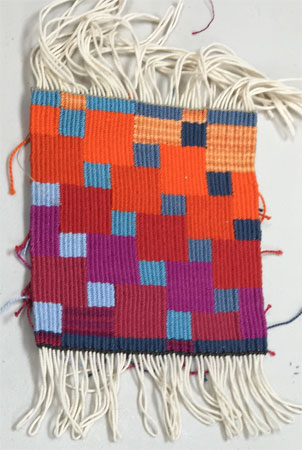
On the home front I also beamed and woven my next hand painted warp. I’ll show you more in the next post, when I have both this and the first wet finished and pressed. I’ll just tell you that as much as I didn’t like how the rayon warp looked or worked, I loved the silk warp twice as much. Now you’ll have to come back to see it!

First painted warp

I’ll be darned if I can get these scarves to photograph with real-life colors. It just is what it is.

After I got the first of my painted warps beamed, I had several personal and family things call me away from the loom. I finally got it threaded in an undulating twill pattern, a slight modification of one I’ve used before. I especially like undulating twill with ‘watery’ colors. For the first scarf I chose a weft that’s the same as one of the very thin solid stripes I added to the warp, an azure blue. I love the way it looks, and with both the coral and dark stripes it has a very under-the-sea feel. (Reminder-the colors here are NOT accurate.)

first painted warp-watery

After much deliberation, I chose a baby blue weft for the second scarf. It’s okay, but not as appealing as the azure…at least while they’re on the loom. Sometimes my eyes like things differently when the pieces are done.

But here’s the real problem.

separating weft threads

After it goes over the breast beam those weft threads are irregularly separating. I’ve tried every strategy I know to eliminate the problem:

  • changing my shirt to something very smooth so there’s no chance that I’m inadvertently moving those threads as I weave.
  • double beating to pack in the weft more tightly.
  • having more tension in the warp.
  • having less tension in the warp.

Nothing worked.  And I did not have this problem with the first scarf.  Or at least I didn’t notice it if I did.

Generally I view such problems as puzzles to be solved.  For some reason, I guess because this is the first of the warps I hand painted, I found it all depressing.  Depression that makes me not want to weave.  So I find other things to do. And there are always plenty of other things to do.

Yesterday morning I made a decision. It’s multi-faceted. I’m going to finish weaving this scarf, cut the warp off the loom, and re-thread the reed to be 24 ends per inch instead of the current 21EPI. Then I’m going to use an unmercerized cotton weft for a little more ‘grab’ in the threads. It’s the best I can do. If I have to throw out one of more of the first two scarves for lack of structure stability, I do, and I’ll chalk it up to learning. There’s nothing I can change about them now. Sigh.

It’s not easy

Taking good photos of my finished work is not easy for me. I spent a long time, took almost 50 photos of five finished scarves, and ended up with five shots that are passable, but not great. I tried various props, lighting, and layouts. I tried with hanging and laying flat. Nothing wonderful happened….sigh. This is exactly why I have a professional photographer take my photos for jurying!

Anyway, for moderately successful amateur photographs of my last weaving, here goes, in order woven.

Black & white point twill shadow weave.
tencel scarf-black & white shadow twill

Brown silk with embedded sequins.
brown silk scarf with embedded sequins

Hunter tencel with light green tencel spots.
tencel scarf-hunter and light green

Hunter with azure tencel spots. I thought this would be my favorite of the three, but it’s actually the two greens above.
tencel scarf-hunter with azure spots

Hunter with several colors of tencel spots.
tencel scarf-hunter and multi-colored spots

Cherry and spice tencel ‘clasped blocks.’
tencel scarf-red blocks

Faster than fast

The last 3 warps I wove were slow. First was the 8 harness shadow weave. Two colors in the weft = 2 shuttles = slow weaving.

Next up was the brown silk, in which I had to hand insert sequins into every 56th pick for the length of the scarf.

Third was the little boxes on green. Again, 2 shuttles = slow.

So by the time I got to the red warp, I’d really forgotten how quickly weaving can go when it’s simple treadling, narrow width, 1 color weft. The colors are not at all realistic in the next shot, which looks very pink.

weaving red spots

This is my interpretation of a draft in Sharon Alderman’s book, Mastering Weave Structures (p. 230). The color in this close up is much closer to real life.

weaving red spots-close up

I love the interplay of warp & weft threads. It reminds me very much of a well-used graphic of clasped hands – which of course I couldn’t find right now, but this photo gives you the idea.

clasped hands

I used cherry for the warp and spice for the weft – both tencel. I tried a few other colors for weft, but stuck with the spice for all three scarves (very unlike my usual practice). I got all three woven in one day!

I’ve now finished the fringe and wet finished these scarves, as well as pressing them, the little boxes, and the shadow weave. I’ll try to get some decent pics of all today…we’ll see how it goes since I have company coming for dinner and have prep still to do.

So next on the loom is the first of my painted warps! It was not fun to beam, only because I inserted 4 solid mini-bouts into the warp – so 5 bouts warped together – and things got a bit challenging in the process.

beaming different bouts

This and that

Recently I made a few winter salads that I really liked. The first one had quinoa, kale, roasted sweet potato and sunflower seeds with a maple vinaigrette dressing. I added chopped apple, which was great on day 1, but made everything too sweet as the salad aged.

quinoa, kale sweet potato salad

Next up was barley, kale, pomegranate, and dill with a dressing of olive oil & wine vinegar. Very heart healthy.

barley, kale & pomegranate salad

—————————————-

A few days before they dye workshop I took a color workshop. While I didn’t learn new things, there was a lot of reinforcement of concepts. My color choices are made by what my eye likes, not color theory. I can’t tell you the last time I used my color wheel to consciously choose colors. As a result, I often overlook complementary color combinations.

We did a lot of wrapping of various color combos on black foam core board to see how things worked together. I didn’t photograph mine but did take pix of some of other people’s. Here I combined them in one image.

color wrapping exercise

Here’s an example of a little sample tapestry the teacher had made. She used some color combos I would never have put together, yet it is so striking!

striking color tapestry

Would I like a whole piece of it? I can’t say. But I’m hoping that some of what I saw during the day will stick with me and I’ll be a bit more bold and planful with my color choices. In fact, it’s the reasons I chose to make one of the scarves in my last warp with a variety of colors. We’ll see how it looks when it’s all finished.