Archives

Do it again…or not

I didn’t take any process shots of the transparency weaving, but I can talk about it a bit. A woven transparency is a fabric that has a very loosely woven linen background with a patterned inlay. That inlay can be done with color in a very representational style, such as this from handweaver.us:

transparency butterfly

Or a more abstract design that’s almost white on white. (I’d credit the weaver if I knew who it was.)

abstract transparency

I knew I wanted to make a graphic, stylized rose, so I found something online that I thought might work, printed it, and brought it to the workshop with me.

rose design for transparency

Mary McMahon, the teacher, assured me I could do this. This was a 2-day workshop, and at the end of day 1 I was sure that either I couldn’t do it, or it would take untold hours that I didn’t have.

Sometime overnight I realized that my thinking wasn’t right. Much of my difficulty came from the restrictions inherent in the loom – I was using my rigid heddle loom. This led to 3 problems:

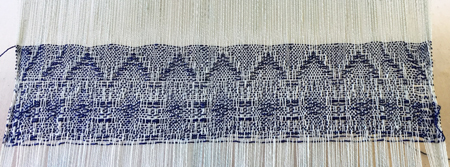
–I could not beat the linen firmly enough. The goal is to have the openings be little squares, but mine were rectangles. I had to just accept this fact, and realize that it was just a sample, and the purpose of the class was to learn the process, not to complete something.

–I had to use thicker linen yarn for the background fabric than the other students, so that the inlay yarns did not have the same impact on my sample as it did on as theirs. I could ameliorate the situation during the workshop by using thicker yarns for my inlays.

–Because of the rectangles and the thicker linen, I couldn’t achieve the curves I was looking for. But if I enlarged my design on a copier, I could try again and get closer to my desired end.

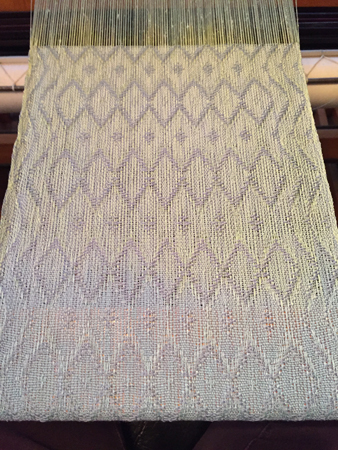
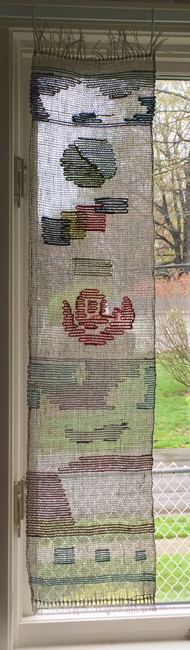
So on day 2 I sat down with these insights and was much happier with my attempts. I didn’t bring home enough linen to finish weaving all the length I had, but that’s ok, because I knew I’d not be able to achieve my intended sample on this loom anyway. But I wove a bit more, cut it off the loom, and hung it in a window in my studio. If you stand back and squint, you may be able to see part of the rose in the middle of the weaving.

transparency from class

As soon as I have time (please control your laughter) I will order some linen, set it up on my counterbalance loom, and try again.

Then there’s the the weaving fail. I often bring that little rigid heddle loom to shows with me to demonstrate weaving. I thought it was time to mix it up a bit, so I rented a triangle loom from the Weavers’ Guild. I’d never used one before, but figured I’d try it at home and then rent it for a show or two.

When I picked the loom up, I was quite pleased at how much it collapsed. It would be a simple matter to add it to a van for a show.

triangle loom collapsed

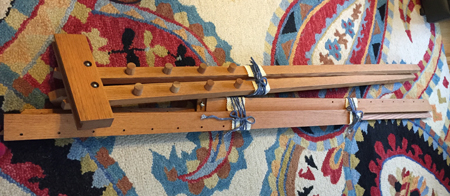
Then I set it up. Ay yi yi! It’s HUGE!

triangle loom set up

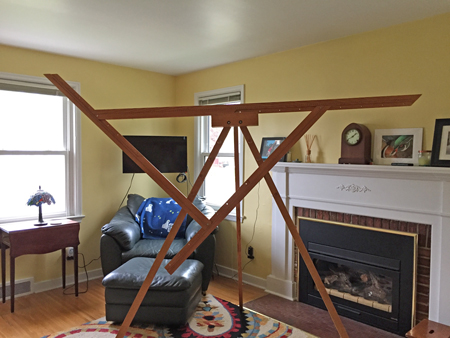
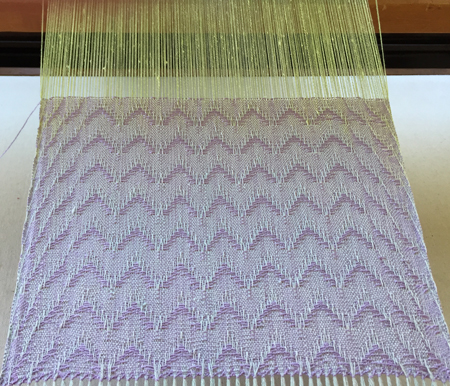
So I watched a few YouTube videos and started weaving. After a few false starts I got the hang of it and was weaving without too much difficulty.

weaving the triangle

But I was clear that this would most definitely not come to shows with me. In addition to the size, it was a slower process than I’d anticipated. Since most shows are outdoors, I couldn’t count on decent enough weather long enough to weave off a triangle, and I couldn’t collapse the loom till the triangle was finished.

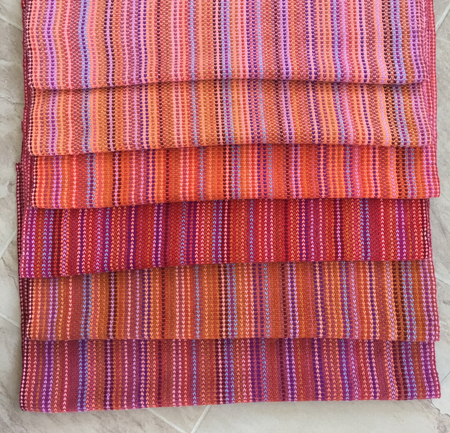
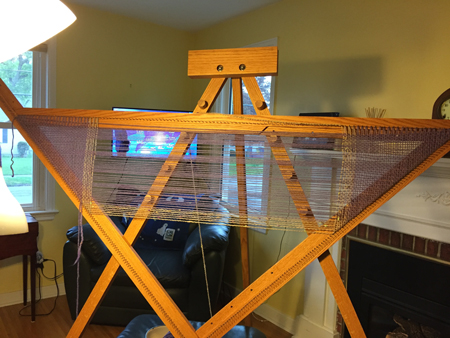
Anyway, I finished the weaving in my living room.

triangle weaving done

See that wonky space in the center of the loom? And the other wonky space at the top? I was hopeful that these would disappear in the wet finishing, that the fibers would shift to take up the space equally.

Wrong!

triangle shawl washed

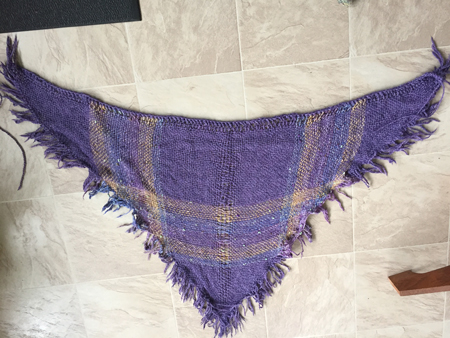
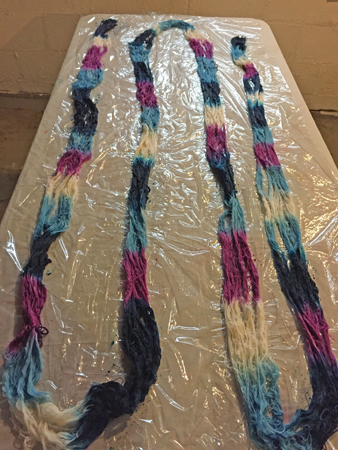
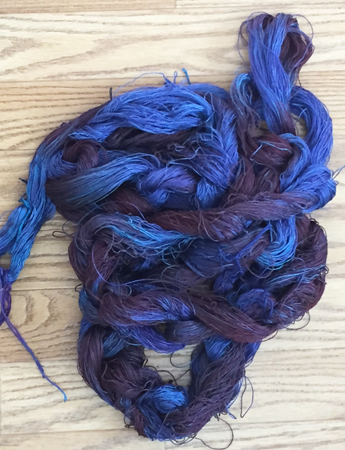
It’s a mess and I hate it. Neither of the spacing problems were resolved, or even improved. I don’t anticipate ever weaving on a triangle loom again. The good news is I bought the yarn at a local thrift store, so I had a minimal investment in materials. I do feel bad that I’ve wasted a lovely purple alpaca yarn, but c’est la vie. It was a good learning experience.

Back to Bumberet

trunk full of leaf mulch
Two weeks. Where does the time go? I’ve been busy, but apparently haven’t blogged. I took advantage of our early spring weather and shovelled 10 buckets of free leaf mulch for my garden, and bought bags of composted manure from the local Agway. Planted early lettuce blend, sugar snap peas, and carrots. Then planted golden beets, spinach, and Red Russian kale. They’re all starting to sprout now.

beaming orange bumberet

Using 13 colors, I measured and beamed another warp for six bumberet towels, this time in mostly oranges with a few other colors thrown in for good measure. Interestingly, what looks turquoise in the towels is very clearly pale blue on the cone, same value as the pale lavender. Color interaction is everything.

As usual for me, I wove each towel with a different color warp. I think this is the order I wove them in.

Pale orange weft:
pale orange weft

Medium ochre weft:

ochre weft

Dark rose weft:
dark rose weft

Dark orange weft:
dark orange weft

Salmon weft:
salmon weft

And the only color that isn’t also in the warp, red weft:
red weft

Here are all six twirled together. I like this shot of brightness.
all six towels twirled together

And all of them layered to show the comparison better, I think.
all six towels stacked

I spent a fair amount of time with that pale orange one doing a single row of needle weaving for a treadling mistake. Should have been simple, but it took me forever. Long enough to get the tops of my feet sunburned as I was doing the work outside to both enjoy the weather and have great light.

I’ve also taken a two-day workshop on weaving transparencies. More on that as soon as I get the last yard or so woven and off the loom. Gotta go weave now!

Colors pale and colors bright

I’ve woven the 3 scarves with that last pastel silk warp. In the process of fringing, then will do bits of needed needle weaving and wet finishing. Still, I can show you some previews now. You already saw the lavender weft. About half way through I realized I had really long floats in one spot (9 threads!), but didn’t want to fix the tie up in midstream, so I hope that float doesn’t make for an unstable/unusable cloth.

Then I decided to go more for texture than color, and used a singles silk with a lot of texture to it. I fixed the tie up and changed the treadling pattern.

raku threading with texture

For the third scarf I used a thicker weft in a cotton-linen blend, and changed the treadling again. I really like how it looked on the loom.

raku scarf with fancy treadling

Meanwhile I wanted to get back in the dye studio (aka my basement) while the weather forecast was for rain. So I planned and measured for 2 more warps. One was inspired by this great print of a mallard wood duck by Bob Ripley that I bought at Cazenovia Artisans. (Sorry the photo isn’t so great; the painting is.)

Mallard inspiration painting

The colors aren’t exactly what I had in mind, but I can use black, blue, or white for weft to create more of the look I had intended. Here’s that warp dried and chained.

Mallard yarn chained

For the other warp, I was truly inspired by Denise Kovnat‘s talk at Monday’s Weavers Guild evening meeting. The presentation was on paint 2, beam 1, a concept that hadn’t previously moved me, but it did after I heard her speak. The basics are paint 2 warps in complementary colorways, beam them together, use parallel threading, sett close and use a weft that is finer than the warp, achieve a warp-faced fabric. So I picked the colors of pansies, and here are my two warps chained and swirled together.

Pansies warps 1 & 2

I think they look smashing. Hope they do after they are woven, too. 🙂

I have two more painted colorways in mind, but need to weave some more right now. Am currently working on another 6 bumberet towels in pinks and oranges. I sold 3 of the 6 in the blues and greens. 🙂

Hard at work

After the job of painting the arbor I needed to do something that would be both noticeable (hard to see that you’ve painted black on something that was already black) and, hopefully, beautiful. So I planned 4 warps, measured out 2 of them of 10/2 tencel, and got out my dyes.

painting teals and purple

First I wanted to use a dark to light teal. After my experience with the last batch of scarves and the fact that the light and dark magenta looked pretty much the same, I made sure that my teals would look different. I was quite surprised to learn that at 1/4 strength there still wasn’t much difference. I used about 1/8 strength for the light, and decided to throw in some light purple for good measure. I left some short sections undyed, too.

Then I moved on to what I wanted to be terracotta and dusty rose.

terra-notta and rose

I know it looks incredibly dark there, but I’ve had just a bit of experience now to see how much lighter the colors are after the yarn has dried, so I felt hopeful.

I batched, rinsed, hung, and dried.

terra-notta on rack

O.M.G. That orange is AWFUL!!! Definitely terra-NOTTA. So bright there’s no way I can imagine using it. So on my morning walk I thought about what I would do, and decided that instead of trying to paint over the awful orange sections, I’d overdye the whole thing with the remaining teal dye since I’d mixed far too much. I figured I had nothing to lose…if I still hated it, I’d toss it out.

overdyeing terra-notta

As soon as it went into the dye batch I was like, “Uh oh. You can barely see the difference in the two different colors.” Nothing to do but continue with the process. Although I did shorten the time…it was supposed to be in the immersion bath at least an hour, and I took it out after half that time.

rats nest of yarn

When I hung it on the drying rack it still looked all black. And now I had a rats nest, to boot. All that handling and moving about of the warps got everything really tangled. Again I figured I’d probably have to toss it out.

I was pleasantly surprised when it was finally dry.

a pleasant dye surprise

It is dark, much darker than my usual dyes, and I will need to choose light-colored wefts for it, but it’s actually attractive. I did break some threads getting it as straight as I could after it was dry, and I’m betting it’ll still be a bear to beam, but at least it has potential.

But here’s the completed yarn that I really like. A lot. Very happy with the results.
lovely blues and purple

Granted the blues aren’t really teal, but I’m fine with that.

While I was waiting for all that yarn to process, I beamed the last hand painted warp I had. It’s 30/2 silk and I think I dyed it in my last dye class (before I started dyeing at home). It’s very pastel blue and green, and each color is longer than I’d like. (I’ve learned that for my taste, short sections of color are much preferred.)

I spent some time planning the weave structure. I started with the Raku draft from 60 Scarves for 60 Years from the Weaver’s Guild of Baltimore’s anniversary book. Then I made some changes in Fiberworks to threading, treadling, and tie up, threaded the loom, and tried out a twilight silk weft.

trying treadling and weft

Well, I hated the results – the first inch or so in the picture. So I changed the tie up to the original from the book and tried that. Much better. But I hated the color of the silk. So I pulled that out and started with a lovely lavender.

raku vs on hanpainted silk

I’m quite pleased.

Evidence

Tshirt with paint

There’s some evidence that I was painting. All day today. 10AM – 4PM.

paint on my arm

And evidence that I’m a slob. Not a neat painter. A few years ago I hired a neighbor to do some painting at my old house to get it ready for sale. She did both interior and some exterior painting. Didn’t get a drop of paint on her. Not. One. Drop. Clearly that’s not my style.

arbor painted

My wonderful son did the necessary grinding/wire brushing yesterday afternoon to get my beautiful arbor ready for painting, and started the job. I finished it today. We used an oil-based paint. Tough stuff. By the time I was done my brush and the paint itself felt like I was brushing on tar. Should last a good long time.

Threw out the Tshirt and shorts I was wearing. Spent a good long time with mineral spirits getting the overwhelming majority of paint off my skin, then took a nice long shower. I’m sure some spots are still there and will need to wear off.

But it was a good thing we took advantage of the unseasonably warm weather and got the job done, since my climbing hydrangea leaves were opening almost as I watched; I planted it last summer and am training it to climb the arbor and create shade, beauty, and attraction for flying things. My forsythia and hyacinth blossoms opened today, too.

climbing hydrangea

Glad I got one more job I didn’t want to do off my to-do list.