|
|
I’ve said it often enough – I’m into the gem tone colors. Purples, blues, greens, reds – they just call to me. I realize that other people have different color preferences, so I do try to pick yarns that will please other palettes, too. Sometimes I really like them, sometimes not so much.
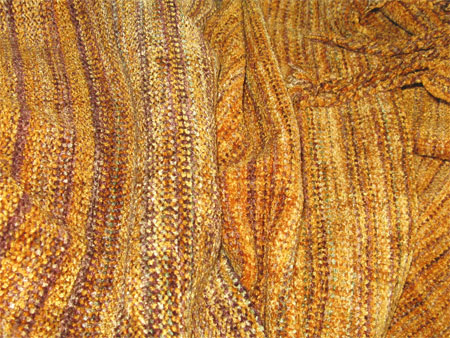
This new-to-me colorway that Tammy hand painted is just stunning! This is one of the few times that I think Tammy missed on the name of her colors. She calls this one cappucino, which to me has no gold in it.
Weaving with it was like basking in the sunshine, just making me smile the entire time. And the finished scarf is equally as bright and pleasing. It doesn’t go with most of my clothes, but I’m pretty sure will draw lots of attention at shows.
Like all my rayon chenille, it’s quite difficult to photograph — the natural sheen of the fibers causes light to bounce around like crazy. Despite many attempts in all sorts of different lighting conditions, I don’t feel like a did a great job of capturing the true colors of these scarves. I’m certain they’ll make a much bigger hit in person than in the photo, and will be surprised if they sell from my website.
There was one interesting thing about these scarves. I’ve learned that when I’m using a variegated yarn for the warp (length) and a solid yarn for the weft (width), I pretty much always like to use the darkest color in the scarf for weft. This time? No. I much prefer the solid golden weft to the dark brown weft. I know that the picture doesn’t show that much difference, but in real life I see a strong difference, and don’t get the same make-me-smile feeling from the scarf on the left with the brown weft.
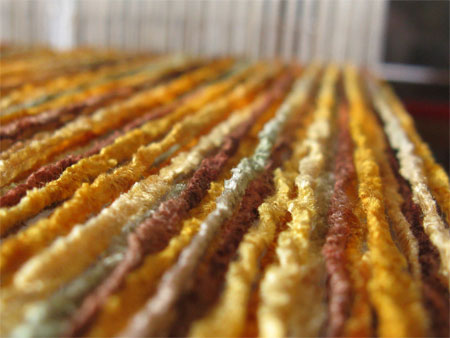
I’m going to leave you with another photo of this scarf, on the loom. The late afternoon sun (which has been relatively rare for the past few weeks) was streaming in the window, catching my warp beautifully. I took lots of pix of it from different angles, learning just how many possibilities there are for lovely, artistic photos, even if they’re not something I could submit for jurying. 🙂
I’m on a sock kick. I can’t seem to stop knitting socks.
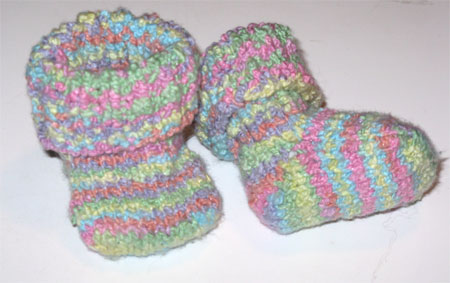
So I decided to make some cute, little baby socks for my to-be grandchild. I bought a skein of Bernat baby stretch yarn in a brighter-than-pastel color blend, then went on an online search for a pattern. Unlike the booties I made for Christmas, I wanted these socks to actually be useful. They should be the right size, and should be made so they’d actually stay on little feet.
Most of the patterns I found didn’t go down to newborn size. I found one that did, and I liked the way it looked. The first thing I had to do was learn how to do a provisional cast on. I’d never heard of it before, so went a-searching, and found a video I thought showed it very well.
Now I was off & running, or so I thought.
I had to convert the directions, which called for using a circular needle, to knitting on 4 needles – a new experience for me. Ok, now on to knitting.
This pattern called for toe-up socks. So I made the foot, and got to the heel. I followed the directions, and didn’t like the look at all. Ripped it out, and decided to modify the directions again, using the same method to make and turn the heel that I’d used on my second socks.
Great. Now I’ve got the foot & the heel, and move onto the leg portion, which was a large portion of what drew me to this pattern in the first place. Again, I follow the directions, but don’t like the result. I found them much cuter in the picture than in real life. So I ripped it out again, making my third pattern modification to make a simple knit 1, pearl 1 ribbing.
Fortunately, as I made each change I wrote down what I did so that I could copy the directions for the second sock.
I’m REALLY happy with the results, and will definitely use this much-modified pattern again. I was also quite pleased with myself. I’d never made baby socks before — it’s only the 3rd pair of socks I’d ever made, and smaller is generally not easier than larger in making things. Then, I’d never modified a knitting pattern before, other than making a sleeve shorter, for example, to fit better.
Finally, I couldn’t help but appreciate the whole process. If I hadn’t gotten encouragement from a woman in my fiber arts guild, I wouldn’t have attempted the booties for Christmas. If I hadn’t made the unappealing knitted baby bootie at Christmas, I wouldn’t have been able to follow the directions well for my first socks. If I hadn’t then made the second socks, using a toe-up pattern, I wouldn’t have had either the knowledge or skills to modify the pattern of the baby socks. If I hadn’t had prior encouragement from another guild member, I wouldn’t have had the confidence to simply modify the pattern. (And if I hadn’t gotten high speed I never would have been able to watch the video.)
So it was all a beautiful learning progression, and one I’m grateful for.
Today I learned how to make a yarn button.
My fiber arts guild meets monthly, and we’ve begun having a program at the end of every meeting. Members can choose to stay for the program or not. For me, it depends on both the topic and other demands on my time.
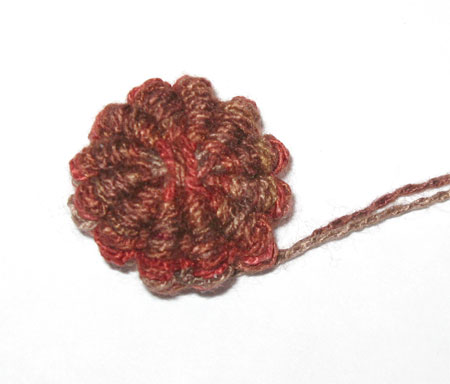
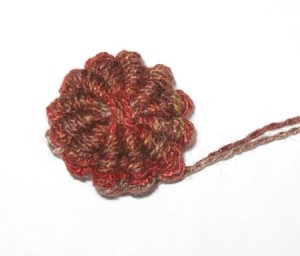
Today’s program was how to make these cool buttons, so I stayed. It was a little time consuming, but not difficult. I’m sure once you got in the groove with it, you could knock out a six or eight buttons while you were watching a movie.
We started by making a template from the lid of a yogurt container (or similar). Then wind the yarn in a particular pattern to form the ‘spokes’ – the ridged sections. Next do a form of twining — weaving the yarn around those spokes, creating something that looked sort of like a stylized star.
Remove the finished star from the template. At this point it looks more like a daisy. Make a running stitch with the yarn round the outer loops of that daisy. Now hold a button of the correct size (smaller than the daisy, but not too small) on the underside of the daisy, and pull the yarn to gather the daisy on the back side. If you’ve ever made cloth “pennies” for quilting or applique, the process is similar. The button on the inside of your yarn button can be old & ugly – it’s there simply to provide stability to your yarn button. You can use a button with holes or a shank button, as you choose.
Voila, the result is a lovely button made of yarn, with a rather sea urchin-like structure and appearance. Your button can be large or small, thick and puffy or quite flat. It all depends on the size of your template, the size of your yarn, and how you choose to gather and/or stuff the button.
My button isn’t perfect, but I’m perfectly happy with it for a first attempt. Since I don’t knit sweaters or other things that use buttons, I’m not sure how often I’ll use them, but I know they’d work well on my handwoven wrist warmers. I can also see them, without an actual button inside, used to decorate a woven scarf.
If you’re interested, let me know and I can make another button step by step, photographing each step and post the complete instructions.

This is just one of nature’s little oddities. At least to me it is.
Those cubes in the bottom of this small jar — doesn’t it look like they’re mostly melted ice cubes at the bottom of a glass? But they’re not. They’re cubes of maple sugar, left at the bottom of a jar that had some really delicious homemade maple syrup in it. I used all the syrup up, and these cubes are left.
I tried setting the jar in a shallow pan of water that had just boiled, thinking I could soften them up, the way I soften up hard honey. Nope. Doesn’t touch them. They remain solid, hard, and completely stuck to the bottom of the jar.
I tried putting the jar in my microwave for a few minutes, hoping the same thing.
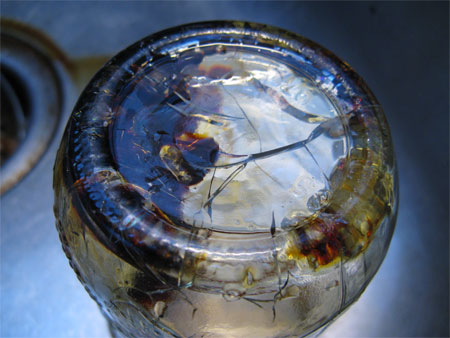
I should have been standing right by the nuker. In less than a minute and a half, it burned the sugar crystals and totally cracked the jar. Now my house smells like burnt sugar and I’ve wasted a perfectly good half-pint canning jar.
This isn’t the first time it’s happened to me, or I’d think it simply an anomaly. (Clarification: It isn’t the first time those crystals have formed and become one with the jar. It is the first time I tried the nuker thing. I wouldn’t be dumb enough to do that experiment twice!)
I remember back from my science classes that sugar forms crystals. I even have the experience of making rock candy from super-saturated simple syrup. But somehow this seems different to me. I can’t explain why, exactly. The shape of the crystals? Their insistence on being one with the jar?
So if you have a science background, or a maple sugaring background, I’d love to hear from you on why this happens and how I can make use of those yummy crystals in the future.
 Margaret gave me this cute piece of original art for Christmas. It was drawn & inked by her friend Stephanie Piro for the Six Chix comic strip. Margaret gave me this cute piece of original art for Christmas. It was drawn & inked by her friend Stephanie Piro for the Six Chix comic strip.
At shows, I’m often asked about how I tie scarves. I don’t do anything fancy, and assure people they don’t need to, either. I most often do either the simple wrap around the neck or a simple keyhole. If I really want to keep my neck and chest warm, I do what I call a modified keyhole – it does the trick.
Anything fancier than that is not only a bit over my head, it generally calls for a very lightweight silk or polyester scarf, which aren’t what I weave. Besides, in real life, I’m rather like the “I’m always cold” model. IMHO, you DO have to be born, if not French, at least into some whole other type of culture than I have, to be that person.
All that being said, there are plenty of places online where you can see drawings or videos of how to tie scarves. If you’ve got ‘real’ high speed (that is, you don’t live in the sticks with a little dish on your roof), you can find plenty fast. Pick your style, and the kind of scarf you have, and you’ll have options galore.
Your turn: do you do a simple wrap, or a fancier one?
P.S. Today’s the last day of the V7N 30-day blog challenge. Although I did miss a few days, I’m glad I did it. I don’t intend to stay with a post a day, but do intend to be much more regular – at least 2 a week. Thanks, Cricket, for inspiring me!

|
|