Archives

It’s In The Bag

While my daughter and her husband were in the hospital laboring to birth their beautiful son, my assignment was to be at their house to take care of their three animals. I was happy to do so.

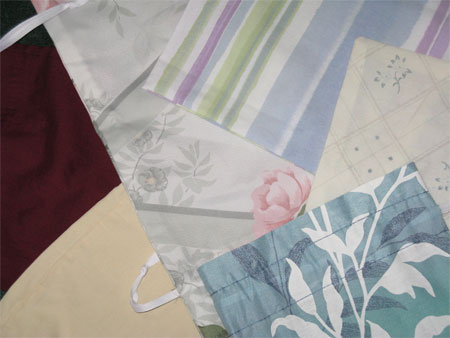
I was a bit challenged in my thinking about this. As an admitted obsessive-compulsive person with the busiest show season rapidly approaching, I knew it’d make me crazy if I didn’t have something productive to do while I was house-and-animal sitting. I warped up my rigid heddle loom with some mohair to recreate that gorgeous purple & silver scarf. Then I thought about it and decided that I would bring that to my next show instead, weaving with it while I was there. Instead, I brought lots of fabric to sew my scarf bags. Every handwoven piece I sell comes in a hand sewn bag. My bags are all made of repurposed fabric – pillowcases work beautifully. It’s part of my philosophy, and my business name – giving things their second wind.
hand sewn scarf bags

I arrived in Rochester on Thursday morning, and by the time that my grandson was born, I’d sewn 3 dozen bags and used up all my fabric. What would I do to occupy myself the next day?

I took a ride to the local thrift store on Friday morning and bought some used curtains. By nightfall I’d sewn another 3 dozen bags.

I still have to put my labels on all of those bags. And I’ll need to develop an alternate strategy for many of them. Usually I print my logo & website on iron-on fabric. That works great on 100% cotton, but is inappropriate for manmade fibers, and many of my new bags are manmade or a blend. I’m thinking that the easiest way (which doesn’t sound like a piece of cake) is to iron my logos onto 100% cotton and then use my free-arm sewing machine to sew that on to the bags. If you have a better, quicker, easier thought, PLEASE let me know!

Before I headed up to Amanda’s, I did manage to get three of those gorgeous eggshell cotton huck lace scarves woven. They went so fast at the Roycroft show, I’m confident they’ll sell quickly at one of my upcoming shows. So now I need to weave some things with lots of color.

Handwoven Silk Scarves-Twill Blocks

While I was at MAFA, I saw some scarves woven in twill blocks that excited me. I saw some other twill blocks online at Weavolution. The beauty of this design – simple to thread, simple to treadle, is that the two colors flip back and forth from the front of the scarf to the back. With part of the scarf woven in a 3/1 twill (over 3 threads, under 1), and part woven in 1/3 (over 1, under 3), the color that’s going over 3 threads become prominent, the other sinks. For an example, look at your jeans. Right side out, they’re mostly blue; inside out, they’re mostly white.

I decided I had to try the technique, and wanted to weave with silk again. Since I had silk in a few colors, I was off and running.

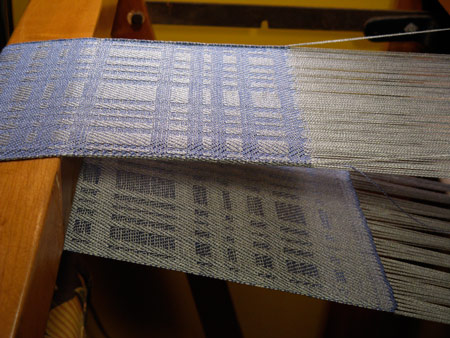
I planned the specifics of the design, and set up the Macomber loom with gray silk. I wove the first scarf in a slate blue. I was thrilled that the technique worked so well. Here you can see both sides at once while it’s on the loom. Mostly blue with gray blocks on top, mostly gray with blue blocks underneath.
handwoven silk scarves, twill blocks on loom

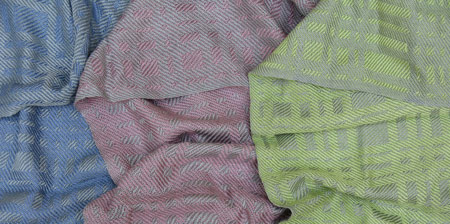
I wove the second in dusty rose and the third in a bright yellow-green. Here are the three of them together, with each of them flipped over so you can see both sides at once.
3 handwoven silk scarves twill blocks

I do wish the gray was a little lighter, more silver than gray, but they’re all just fine. They’re soft, smooth, and drape well. I think people will like them.

On Weaving…and not

I did some weaving in the last two weeks, but not for this week. Why not? I have a brand new grandson!! My first grandchild, and very exciting. I don’t have any pix of him yet (he & his parents will be arriving home today), so I’ll show you some of what I wove before I came up to help out.

I started with three scarves of 20/2 undyed silk.
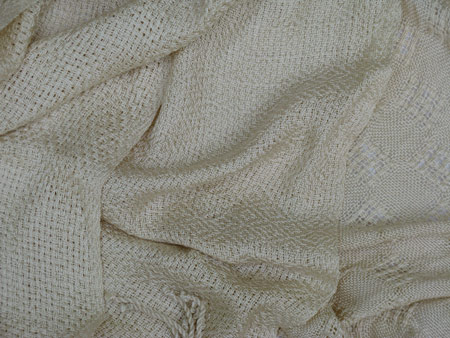
handwoven silk scarves, eggshell

I set them up for a complex diamond twill on my counterbalance loom at 24 ends per inch, and wove the first one (on the left). It was challenging to see the pattern while it was on the loom, so I used a much simpler treadling for the second scarf (middle). You can easily see the diamond twill.

Since I hadn’t worked with the silk before, and you can’t ever tell how soft a scarf while be while it’s still under all the tension of the loom, I was afraid that the scarves would be stiffer than what I wanted, so I cut those two scarves off and totally rethreaded both heddles and reed. I threaded the harnesses for huck lace blocks, and sett the reed at 18 ends per inch, which is the number of threads per inch I used when I wove the huck lace blocks in cotton, cashmere-silk, and tencel. I wove the third eggshell scarf (on the right), then cut them all off, twisted the fringe, and wet finished the scarves.

I was quite surprised. After the wet finishing and pressing, the twill scarves are much softer and have a better drape than the huck blocks. Despite the fact that the huck scarves are sett further (fewer threads per inch). It’s all that plain weave between the lace blocks.

I’m gonna go do some straightening up before the new parents & baby arrive home. More handwoven silk scarves tomorrow.

MAFA Weaving Sample

Robyn Spady is an amazing teacher! She’s knowledgeable, organized, friendly, patient, and flexible. Her Extreme Warp Makeover workshop was really great.

Any fears I had about having too much time and not enough warp were completely unfounded. I put on 4-1/2 yards, and got less than 2 woven. I learned LOTS!

I was supposed to weave 30 different patterns on one treadling. I realized after I got home and wet finished that I left one out, so I have only 29. Oh well. Anyway, here they are, in all their glory (not). You’ll notice that you don’t usually see my selvedges – they are BAD. I was focused on trying the various treadlings on a new-to-me loom, not on my selvedges. I also made several treadling errors, some of which are really obvious, some not so much. If I saw the error as I was weaving, I went back and fixed it; the ones that remain I didn’t see during class.

First we did four different lace weaves. As I said, I’d chosen the overshot threading, so I was a surprised we could do any type of lace weave with it. Because the warp & weft were the same color (white), it’s hard to see the detail in the photo.
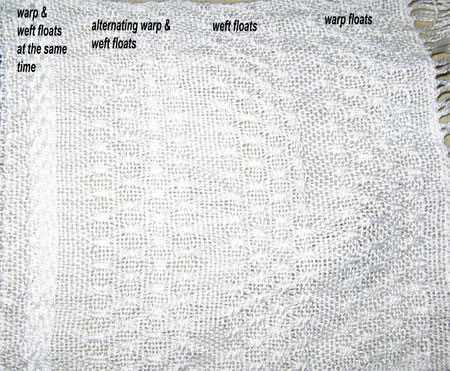
4 lace weaves

Next we did waffle fashion. This isn’t a true waffle weave, which requires a specific threading and treadling combo, but rather a treadling that creates some amount of dimension in the weaving. This didn’t work so well on the overshot threading, particularly when combined with the fact that I couldn’t beat very hard on the table loom. This last fact impacted many of the patterns.

Following waffle fashion were 5 different twills. The lace and the twills were the parts that were most familiar to me. Here’s the one sole example of when the lack of a hard beat improved the look – the patterns were more open than the samples Robyn had woven on her floor loom.
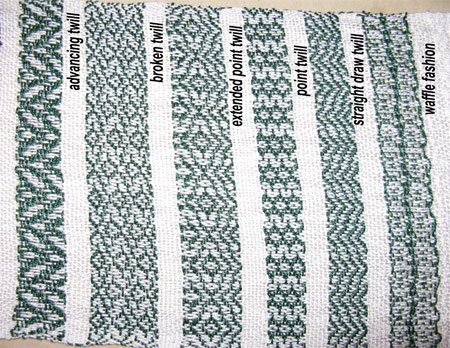
waffle fashion and twill weaves

Next came some traditional overshot. I’d never woven any overshot before. In general, I think for me, it may be best used sparingly instead of all over the way the coverlets were. But I may feel differently as I explore it more.

It’s pretty easy to see where I missed two of the picks in the treadling sequence in the star fashion.

After the overshot came shadow fashion. You can see the pattern better if you squint. This is an example of when the lack of a firm beat hurt the visual.

On opposites was interesting. Determine the pattern you want to follow, then insert another pick between each of the pattern picks. In this ‘extra’ pick, raise the two shafts that were up in the first pick. So if in pick 1 I raised 1&2, in pick 2 I raised 3&4.

On opposites polychrome was nice, too – you worked with 2 complementary colors instead of your pattern color and warp color.
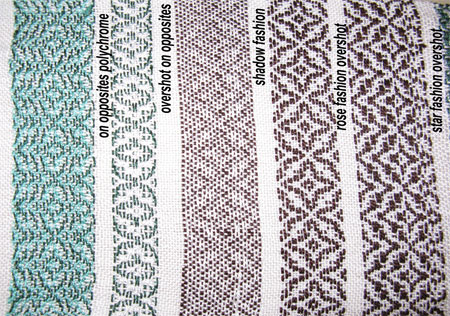
overshot, shadow, and on opposites weaves

Next up was monk’s belt. I’ve never been fond of this pattern visually, and found I didn’t like weaving it much, either, so I wove only half of the treadlings and moved on.

Before the class, I would have told you that I wouldn’t have liked weaving that looked like fine needlework. And I would have been wrong yet again. I do. I like weaving it, and I like the way it looks. I liked the cleanliness of the swivel and petit-point better than the polychrome. This is where I inadvertently skipped a sample. I was supposed to weave the swivel with the colors switched – white where it had been dark and vice versa. It does give a different, complementary pattern.
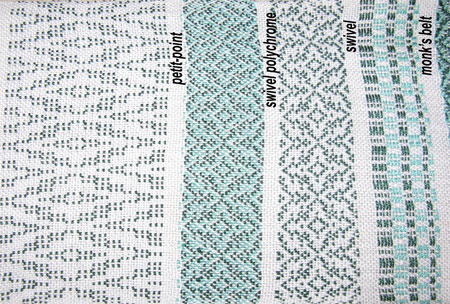
swivel and petit-point weaving

Next up was crackle fashion. Again, not a true crackle weave, but an imitation of one. Crackle weave is supposed to remind the viewer of pottery with crackle finishes. I don’t much care for that pottery, or that weave pattern.

Then came the summer and winter fashion weaves. (Nope, not true summer & winter.) Again a surprise for me. I didn’t think I’d like the dukagang (a Swedish structure), but I do.
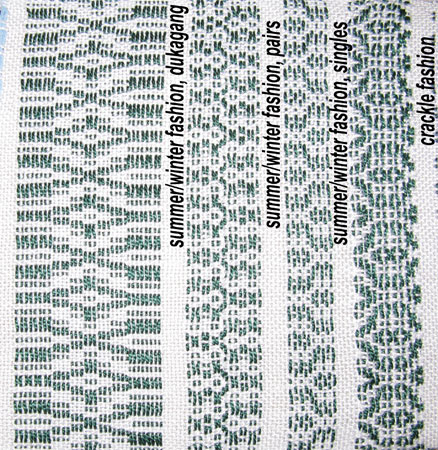
crackle, summer and winter fashion weaves

The double faced weave was quite interesting. (It’s quite different from doubleweave.) You can see that it’s the same pattern, dark brown on one side and light blue on the other. It takes a long time to weave, and the finished fabric is quite thick.
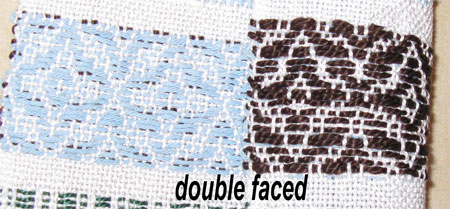
double faced weave

A ribbed weave was next. I made several treadling errors, so mine didn’t rib the way it should have. I’ll admit it – I saw before I was done with the sample that I’d made errors, but I didn’t have the energy to unweave and reweave.

Now was the corduroy. This really didn’t work well with the lack of firm beat of the table loom. I did cut a few of the rows of cords, but I’m positive it will all pull out easily, so I stopped. So don’t take my example as a good one. It’s really an amazingly impressive technique.

I used three strands of heavier yarn together for the deflected weave, which worked quite well.

We finished our selection with the echo fashion. When beat more firmly, it appears that there’s a glow around the darker pattern.
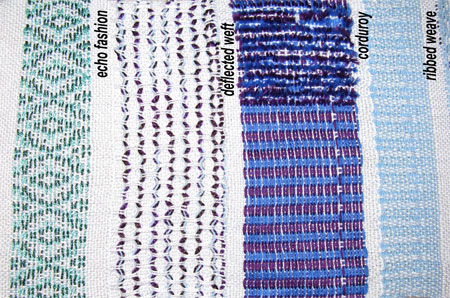
ribbed, corduroy, deflected, and echo weaves

I learned other things, too, that I didn’t have time to weave over the weekend. They’re for some future post.

MAFA Prep

I’m leaving in just a few hours for my first ever MAFA conference. I registered back in November, over 7 months ago, so I guess you could say I’m eager. 🙂

I’m in Robyn Spady‘s Extreme Warp Makeover class, learning how to make 30 different fabrics from one tie up. Wow!

Neither of my floor loom is very portable, neither would fit in my little Yaris, and my rigid heddle wouldn’t do because I needed a minimum of 4 harnesses for the workshop, so I borrowed a 4H Mountain loom from one of my friends. We had 3 choices of threadings – overshot, rosepath, or huck. I specifically chose overshot since I’d never done that threading before.

I warped up the loom, learning – again – that every loom is different, and they all take their own unique movements and ‘tricks’ when warping and threading heddles. As always, I like my own looms best – I know exactly what I need to do with them to make my life easier.

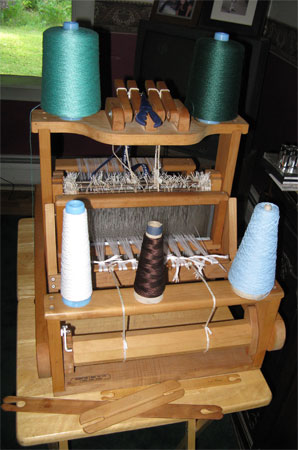
Here’s the loom, along with the shuttles and fibers I’ll be bringing with me.
loom & yarn ready for MAFA conference

I am curious as to how it can possibly take 2-1/2 days to weave 3 yards of warp, which is all we needed to put on. I wound on about 4.5 yards, but still….

I still have to gather everything else I need, from clothing to pillows and towels, so I must go do that. RIGHT NOW!!