Archives

Good things are happening

Good things like not one but two batches of towels finished and listed in my Etsy shop. First up is that neutrals warp I talked about in the last post. The towels turned out great, if I do say so myself.

8 neutral towels in Ms & Os

You can see that although I was able to ease in the hem, it still flares a little, but I’m okay with it.
natural Ms & Os towel

In fact, I liked the towels so well that I decided to put on another warp in that Ms & Os structure, although designed differently. A threading error and reed sleying error, both of which happen often, and I was off and running with a warp that alternated stripes of color with natural, undyed cotton.

8 Ms & Os towels form a flower

The colors in these towels make them brighter than the neutrals, but still not as colorful as my work tends to be. 🙂

8 folded towels in a stack

Now, I’m working hard at using up my stash. That means using both color combinations and yarn sizes that are a bit of a stretch for me. This towel warp has 8/2 cotton (natural), 10/2 cotton (peacock and burgundy), and 12/2 cotton (goldenrod, pink, and sage). I therefore had to sett the yarns differently to make sure I had a good quality cloth at the end. I sett the 8/2 cotton at 24 ends per inch (EPI), which is my standard for towels, the 10/2 at 28 EPI, and the 12/2 at 32 EPI. I’ve never mixed setts in a single warp before and wasn’t sure how easy or difficult this would be to accomplish, and how the finished fabric would look and feel.

Well. The combination of 16 ends in each of the colored stripes and a 12 dent reed made adjusting the sett super easy. And the finished fabric? It’s a tad lighter than my usual, especially since I used those same yarns for weft, but that means that if you want to get your hand inside a glass to dry it, this towel will serve better than my usual. Of course, I can’t remember the last time I dried my dishes; they simply sit in the drainer overnight. But the weight and feel of the fabric? I bet most people wouldn’t even notice the difference. It’s all equally stable and functional. One more tool in my belt that I will need to use as I proceed. 😀

I started by weaving one towel with each of the six colors in the warp. As I wove I liked them all, the darks and the lights. But with a warp for eight, I had to pick two colors to repeat. Sure I could have used entirely different colors, but I didn’t have anything in my stash that I thought worked well with everything. I ended up doing a second towel each in the goldenrod and natural. And honestly? When all are finished these ended up being my favorites for sure.

goldenrod Ms & Os towel

I feel like there is a lot to learn, a lot of creativity left in the Ms & Os structure, and so have a third towel warp, again designed slightly differently, measured out and ready to beam. But I plan to stop there and give my customers something more like my rainbow blocks. At least that’s what I’m thinking at the moment. Only time will tell, though. Stay tuned…you may be the first to know. 😉

The hits just keep on coming

…if you consider a dope slap to your own head as a hit, that is. The mistakes, aka poor choices/unwise decisions, haven’t stopped yet. Let’s stick with the weaving for those cards for now.

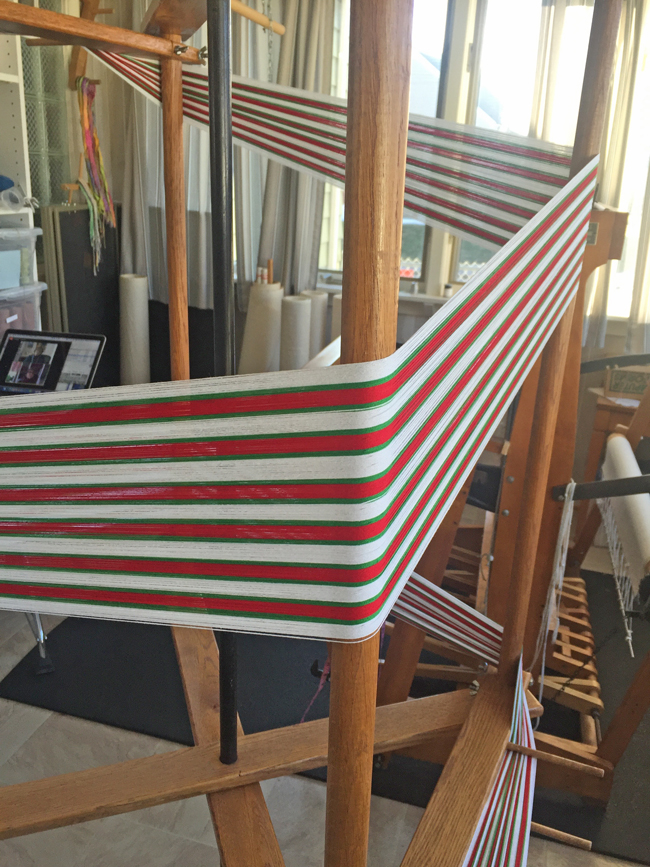
I wanted to get 3 cards across the width of the warp. At 3″ each I could just make it, if I sewed my stabilizing stitches on the machine carefully, just far enough apart for me to carefully cut between those lines. I appropriately switched to a light cream colored thread for this task so that I would be able to see the lines for my cutting.

Sewed the four rows of stitching. Also sewed some stitching width-wise so I could cut off a length and make sure everything fit.

WHAT?!?!?! Not even close!! HUH?!

Are you ready for dope slap #2?

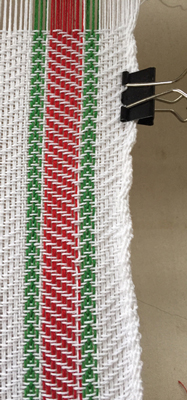
Sure, I knew that the card blanks I ordered had 3″x3″ windows. But I just hadn’t planned for the fact that what you’re going to put into those windows needs to be larger than 3″x3″. A 4″ square will do it. So even with all my work to add extra ends to each selvedge, there was no way I could get 3 cards across. (You may be thinking that I didn’t number that dope slap correctly, that it should have been #1. You’d be wrong. Dope slap #1 was sewing those lines on a yard or more of fabric. Should have only done a small amount for my sample.)

So I played around and realized that I could reasonably get two cards across the width. But only because I had taken all that time and energy to add threads to each selvedge. It would have been too tight otherwise. (Refer to Mistake #7 in the last post) Whew!

Thankfully, one of my earlier errors (Mistake #5) that caused me to put on lots of extra warp also came in handy here. If I hadn’t done that I wouldn’t have had enough woven to make my cards.

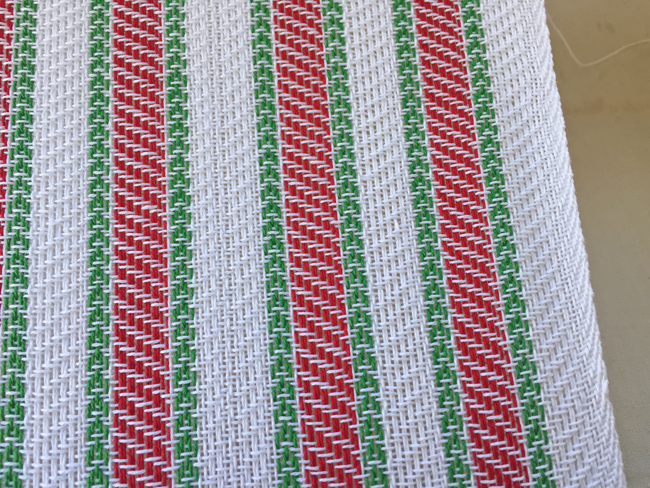
After figuring out how to get two cards across the width I went back to my sewing machine and sewed four more lines of carefully close stitching and cut them apart. I also sewed lots of rows of stitching width-wise and cut them apart there. I decided that in real life I was the only one who would notice, or care, about the earlier rows of stitching that now show through my window.

Today I assembled 30 cards. I’m not sure how many I really need, but I think that will do it. I have extra fabric and extra card blanks if needed. And the good news is that I am pretty sure I will retain lots of those lessons and not make those mistakes again when it’s time to plan next year’s cards. 🙂

****************************

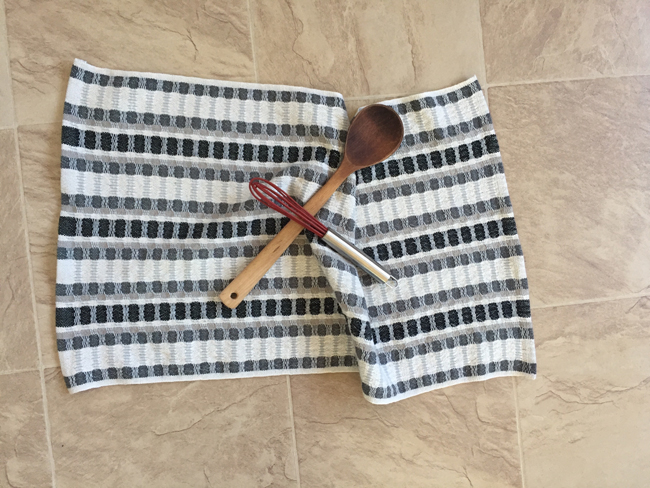
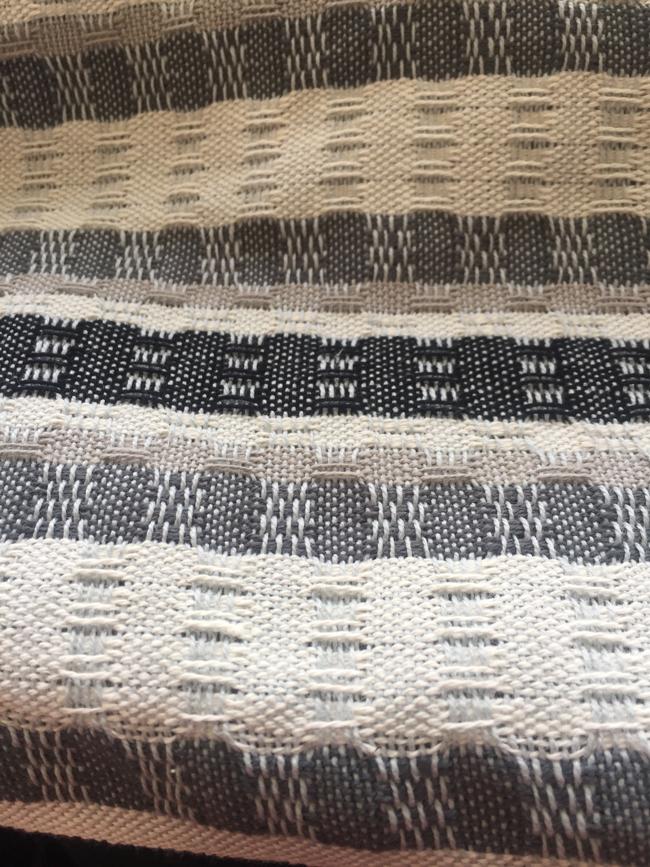
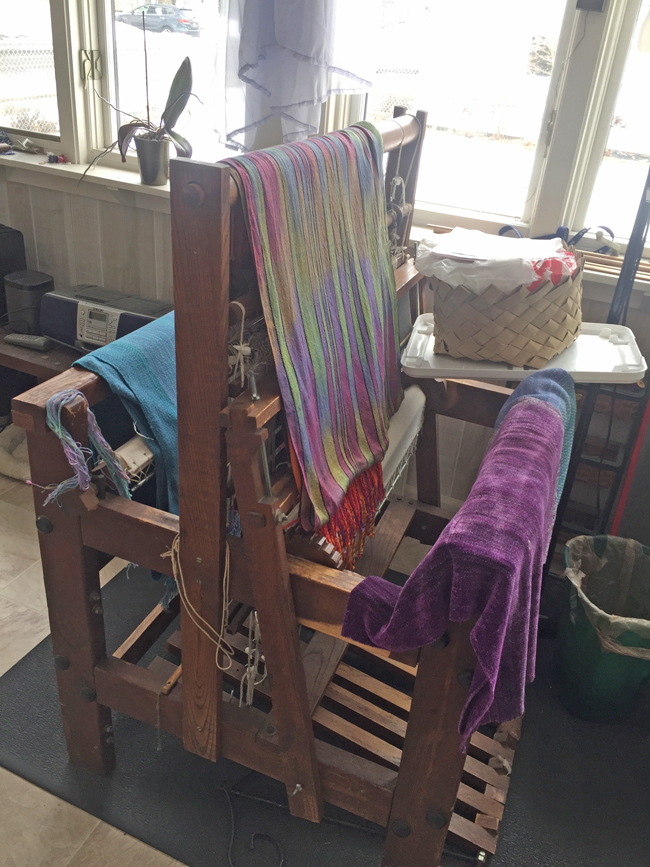
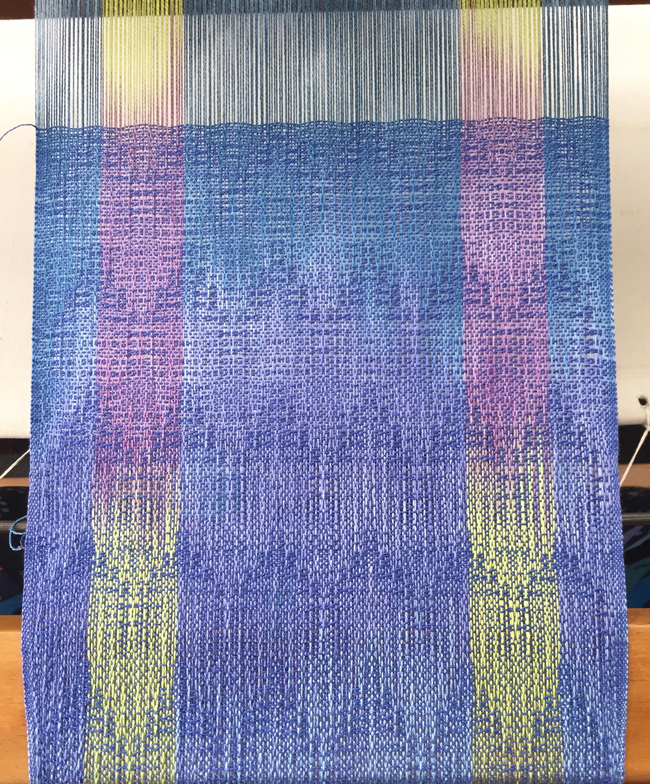
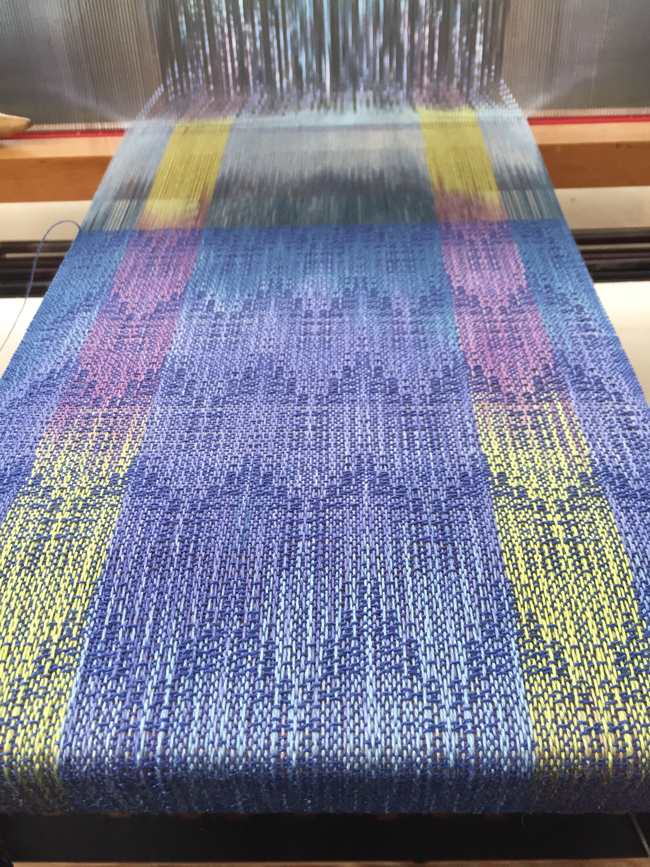
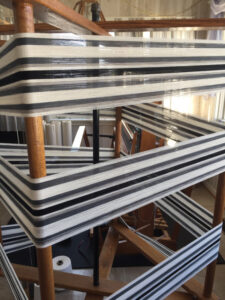
While all that was going on, I decided to warp for more towels. I’m working on stash reduction, so decided to forgo lots of color for some great neutrals. Here’s half of my warp measured out on the warping mill.

measuring out a neutral towel warp

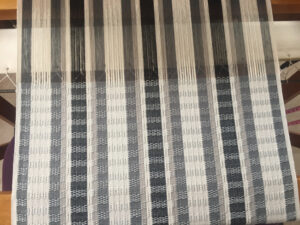
While I have some favorite drafts for sure, I also like to try new things. Or at least new to me. Weaving has been around for centuries and many (most?) drafts have been around for a long time. I’d never woven Ms & Os and decided that it would work great with my neutrals, adding a bit of texture.

Beamed, threaded, sleyed, lashed on, wove a header, and found a threading error. Undid part of the lashing on and fixed that error, re-lashed, evened out the tension, wove another header, found another threading error. Did that yet a third time. I wouldn’t ever give myself a dope slap for a threading error; those things happen. But when I found that first error, why didn’t I look more carefully and find the second? And then when I found the second why didn’t I find the third before I proceeded and had to undo again? DOPE SLAP!

Ms & Os is a very simple treadling, and I was flying along on that first towel.

neutral towels on the loom

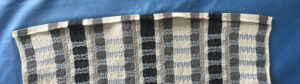
While under tension on the loom, weaving almost always appears flat, even weaving that will have texture later. The warp tension is the reason for much of that, but also the threads don’t have a chance to shift widthwise until the piece is off and in water. So while I was liking it, I wasn’t loving it.

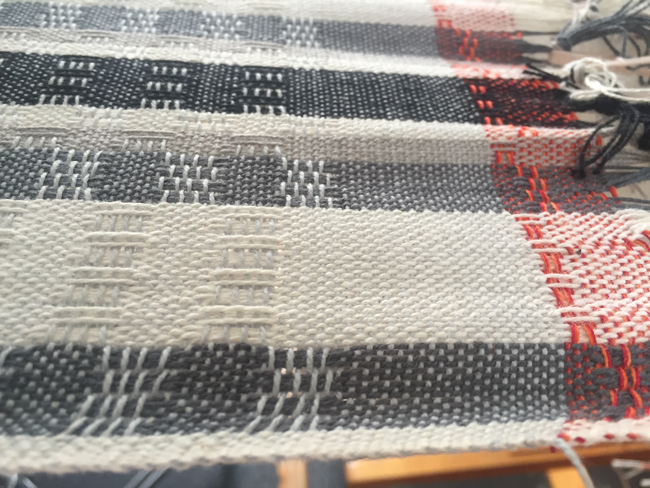
Weaving proceeded. Eventually there was enough length woven that I could see the underside of the cloth. Uh oh! Where are these long floats coming from?

Warp floats on the loom

I went back to my computer and checked the back of the design in my software. Nope, that shouldn’t happen. Double check the tie up – oops, I’d made an error. Again, not the first time, and likely not the last time, but not worth a dope slap.

I stopped weaving for a bit and thought. Would I unweave 2/3 of a towel? No, I would not. Would I simply call that a loss and start where I was to weave the towel? I could, but I was pretty sure I wouldn’t have enough length to get 8 towels out of the warp them. So I decided to keep weaving that towel, figuring I could turn it into a bag or something that had a definite wrong side so the floats wouldn’t matter.

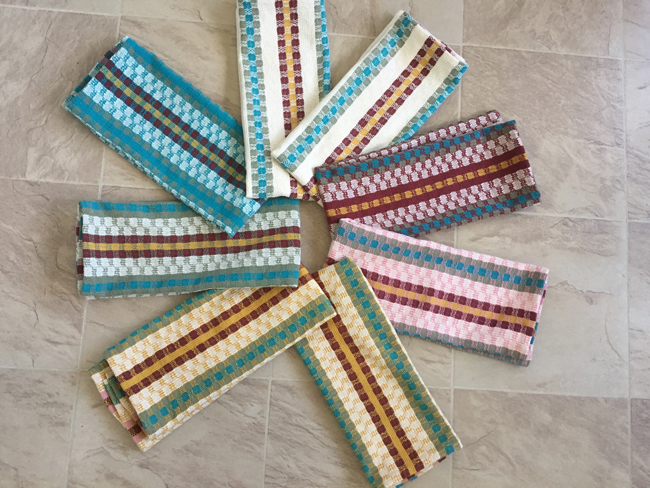
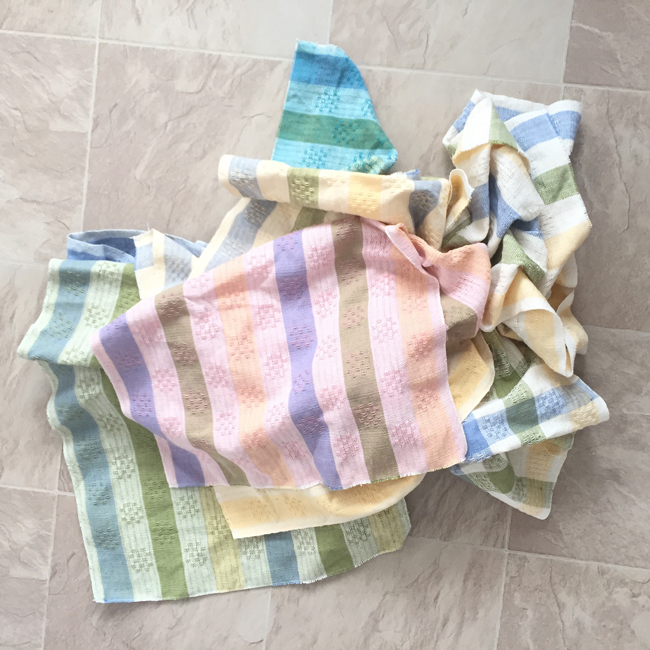
I wove the remaining 7 towels on the warp, cut everything off, and looked at what I had. You know what? I really liked these towels, even before I’d wet finished the to develop the intended texture. I didn’t want to lose that first one, and I knew that the 8-end floats I had were far too long to be useable as a towel.

No problem. This is a very simple structure and needle weaving will be easy. If you’re one of my regular readers you’ve heard me talk about how I hate to needle weave. But this time I decided it wouldn’t be hard and I could do it. So I set to work.

It wasn’t hard, but time was being eaten up at an amazing rate. And while I could listen to an audio book, I couldn’t watch anything on TV as I needed to pay attention constantly.

Lots of floats in neutral towels

I timed myself for a bit. It took me an average of 10 minutes to correct one warp thread for the roughly 21″ needed. That’s not bad, right? Yeah, not until you realize that I had 62 threads to fix. 62 threads x 10 minutes = 620 minutes = more than 10 hours!!! How long would it have taken me to cut out that warp when I first saw the mistake on the loom and start again? Maybe an hour. Dope slap!!

So now all the towels are off the loom, the needle weaving done, the towels washed, dried, and pressed, ready for hemming. Hmmmmm….

I’ve already said I knew I’d get some texture with this weave structure. I could have, and should have, realized that meant that I shouldn’t do a plain weave hem. Plain weave spreads warp threads out to their maximum allowable width. So of course, after wet finishing and the draw-in that would create the desired texture, the hem fans out.

Ms & Os hem flair

Since I hand hem my towels, I MAY be able to ease the hem in with my hemming. Or I may not. I SHOULD have woven the hem in the same Ms & Os pattern. Even if I had used a much thinner weft for the hem, I think plain weave would still have given me a flair. I’m not giving myself a dope slap for this error, but it is worth a big sigh.

And then what happened?

Although I said in my last post that I wasn’t going to share info about what I’m weaving for my 2021 Christmas cards, I changed my mind. After all, it’s not like they’re gifts that need to be kept secret. Besides there’s a ton of info to share. This warp has been, ummmmmmm, problematic. If my experiences can help someone else avoid the same mistakes, great. Or if I revisit this post in the future to avoid the mistakes, also good.

winding warp for candy cane cards

So I started with a draft I’d seen someone else weave online. It appears that it came from someone (Dawn?) on Ravelry, but I’m not positive about that. In any case, it is certainly reminiscent of candy canes, so seemed perfect to me. I didn’t have the bright, saturated colors I wanted so decided I’d just go to my local craft store and buy a few balls of crochet cotton.

I went online and gathered information. That was Mistake #1. The site I found told me that Aunt Lydia’s size 10 crochet cotton was roughly 1,900 yards per pound.

So I determined a sett of 21 ends per inch and calculated what I’d need to make my cards. That was Mistake #2.

In my inexperience with crochet cotton, I thought it was all mercerized. Mistake #3.

I planned out my warp carefully. I wanted to warp it wide enough to weave 3 cards across. So I put extra white threads in between some of the candy cane stripes to leave me enough room to cut them apart.

The night after I had the warp beamed I was in bed and suddenly realized I had made a major error in my warp calculations. I wanted to warp for 30 cards, but my math went wonky, and I’d put on enough warp for 90! Mistake #4. Oh well, the yarn was cheap enough. I’d weave it all – only 120″ after all – and maybe I’d get an idea to do something else with the extra.

Now I’m threading the loom, and I can feel that this yarn isn’t mercerized at all. (See Mistake #3.) Not sure why I didn’t notice this in the prior steps, but I hadn’t. The craft store didn’t have enough white in Aunt Lydia, so I bought mostly South Maid #10. I could see it was the same size, and thought it was the same. Wrong! We’re up to Mistake #5.

It’s okay. The yarn doesn’t have to be mercerized for the cards. So I lashed on to the front apron and started weaving. WHAT?!?! This sett of 21 is WAY too loose. Mistake #6.

candy cane sett way too loose

So I cut it off and resleyed to 24 ends per inch. Lashed on again and started weaving, enough to know that 24EPI would work. But wait! Now the width of the warp went from 12″ wide to 10.5″ wide. Could I still get 3 cards across? If not, my layout was all wrong. I spent some time looking at things carefully, and decided that I could, if I was really careful with my stitching and cutting, get 3 cards across, but only if I added some white threads at each selvedge. I guessed that 8 at each side would do it and measured out my threads. I cut off the 6 or so inches I’d already woven, threaded the new ends, sleyed the reed, and decided to tie on instead. For me it’s a bit quicker than lashing and I don’t need to worry about using up too much warp length – I have plenty.

About this time I did what I should have done at the beginning. I used my McMorran yarn balance to measure the yards per pound of this yarn – almost 3,000. No wonder 21 EPI was too loose!

Time to get back to weaving. Now I’ll tell you that I have never been successful at adding more than a thread or two on the selvedges without problems. I don’t know how other weavers manage it. The weights on my warp are either too heavy and pull the ends too tightly to make a straight fell line, or they’re too loose and the edges are wobbly. I fiddle and adjust and try again. I weave slowly and mess with the threads constantly. I put on my homemade temple in an attempt to help. Nothing works and I am very frustrated. I think we’re on Mistake #7 now.

candy cane BAD selvedges

The selvedge is loose, lumpy, and wavy. I could handle the waviness as it would be hidden in the card, but the lumpiness would present a problem. And the weaving was going very slowly as I attempted various strategies to correct it. Finally I had to walk away from the loom.

Last night I decided the best thing to do was to once again cut off what I’d woven, this time about 18″, pull the remaining warp forward through the heddles and reed, tie the 16 new ends on the back beam, and re-beam it all with the same tension. I did that this morning and weaving FINALLY went smoothly.

weaving candy canes FINALLY

When I ran out of the South Maid yarn and started on the Aunt Lydia’s, I immediately saw that Aunt Lydia is mercerized; South Maid is not. See Mistake #5.

Today I got the rest of the warp, about 90″, woven, washed, dried, and pressed. The machine stitching, cutting, and card making remain to be done. I wonder how many more mistakes I can make during that process.

Oh yeah – I got my Better Than Peeps towels up in my Etsy store. Thanks to ever-supportive family & friends, I’ve already sold 3.

One Problem at a Time

Today is the last day of February. And a few months ago I said – to myself and my blog – that I needed to weave/craft my 2021 Christmas cards in February. But I wasn’t inspired to do so. Nothing struck my fancy. Then late Friday I got the idea. I knew what I would weave for the cards. I found the draft I needed, decided on the fiber, and calculated the amounts needed for warp & weft.

The draft I settled on is a 4-shaft weave. I haven’t done 4-shaft weaving in a long time, but this draft is perfect. (I’m not sharing anything about it here so that everyone who gets my cards will be surprised.) So that solved the first problem.

Then, of course, came the next problem. It only makes sense to warp up my little counterbalance loom for this project so that I can keep weaving towels on my Macomber. Not only has the little loom sat unused for many months, but it’s become a stationary holding zone for stuff.

counterbalance loom covered

Completed weaving, ties for use on my warping mill, a basket made from paper bags, and more…it’s all been ‘stored’ on the loom. Where will I put all that stuff in order to use the loom? I am firmly in the if-you-have-to-move-it-you-have-to-put-it-‘away’ camp, but where is ‘away?’ That’s why that stuff is on the loom! Sigh.

—————————-

Unrelated to weaving, despite what I said in my recent post, I decided I really had to make another batch of sourdough bagels for my freezer. After all, I’d given away many of the first batch. And I’d gone shopping and bought some Everything Bagel seasoning. And my daughter gave me the helpful hint of setting the boiled bagels on a cooling rack to dry for just a few minutes before putting on the parchment to bake.

2nd batch of sourdough bagels

Look – they all have holes! I enlarged those holes before I boiled in an attempt to keep them. This batch has the same great texture. And nothing stuck to the parchment. Unfortunately, that Everything Bagel seasoning is VERY salty. And I love salt, so you know it’s salty! Can you see me shaking my head?

New topic – I finished knitting my gansey motif socks. I’m happy with them, although I do hope the pointy-ness of the right toe settles out in the wash.

hand knit gansey socks

—————————-

Closing with a sneak peek. Here’s a batch of towels fresh off the loom, with the ends secured on my sewing machine and ready for the washer, dryer, pressing, and hemming. They’ll go up in my Etsy shop when they’re done.

sneak peek of peeps towels

Gee whiz

Don’t you hate it when you don’t take your own advice? How many times have I said – to myself and to others – either the color or the weave structure/pattern can be the star. They can’t both be the star. They’ll just fight with each other when they try. But look what I did.

Hand painted Tencel scarf on loom from above

I have this lovely Tencel I handpainted back in October, and I loved the way it looked as I was beaming it, and then I picked a weave structure that’s WAY too complex! Fortunately when I lean back on my stool and take the shot you can see that pattern, so I don’t totally hate it, but I’m just shaking my head at myself. DOH!

HP Tencel scarf on loom from an angle

Other news: I made some sourdough bagels.
sourdough bagels, shaped

They have exactly the right texture for bagels, but look – they lost their holes.

sourdough bagels, baked

That’s not a big deal, but look at this!
parchment stuck to sourdough bagel

I’ve never had parchment stick to anything I baked before. It must be because the bagels have to be boiled before they are baked. I guess I shouldn’t have put them back on parchment, but the recipe didn’t tell me that. I know I made regular yeasted bagels before and simply don’t remember about when/where I used parchment. Oh well.

The question I ask myself is this: were the sourdough bagels better texture or taste than the regular yeasted bagels? I honestly don’t have a clue. I baked the regular bagels a long time ago. And I’m not making another batch of either right now.

Last note for the day…I am SO PROUD of my son-in-law! He’s signed up to be part of the clinical trial for the Johnson & Johnson vaccine. I consider this to be a great service to humanity. Way to go!