Archives

Sample Wrap #2

second sample baby wrap

I finished sample wrap #2 and got it off in the mail. The first tester mom should have received it today. I’m anxious to know if this one is thin enough or if I need to reduce the ends and picks per inch further. I have enough warp on the loom waiting to weave a second wrap, either at the 26 EPI (33 on the selvedges) of this one or something else, based on the feedback I’ll get from my three ever-helpful testing moms.

The picture above shows the difference in appearance between the two sides of the wrap. Below you can see that I wove the ends in a zigzag, 10″ at each end.

end design of wrap

Since I got the wrap done and in the mail a few days ago, I decided I had plenty of time to make some Christmas presents. Can’t show them to you now, of course…wait a bit and you’ll get to see them all.

What’s the diff?

Diane & Ellie wonder what changed in my processes to save me 5 hours in beaming sample wrap #2. I should have taken more photos, but didn’t, so I’ll have to do my best to explain it with words.

I did take one picture mid-beaming, so let’s start there.

beaming sample wrap #2

I used a warping valet both times — that’s the rod you see hanging from my ceiling with chains. Laura Fry made me a warping valet convert some time ago. Was it 12 months? 18? I don’t know, but I do know it was a change I should have made years earlier.

The red arrow points to the chains that hang from my Mac. These chains hold up the harnesses, and as you can see are substantially narrower than the harnesses themselves. This was what caused me to make the biggest mistake on sample wrap #1.

Here’s my process to warp my loom.

  1. Hang the lease sticks from the castle behind the harnesses, using Texsolv so I can adjust the hanging height. Difference #1. (See below for explanations.)
  2. Put the warp chains on the lease sticks, and insert a dowel rod in the loop end. Tie that dowel to the back apron rod.
  3. Spread the warp in a raddle temporarily fixed to my back beam. Difference #2.
  4. Slide the lease sticks to the front of the harnesses, then under the front beam and up to the warping valet.
  5. Wind the thread on back beam, using packing paper, until the lease sticks are near the front beam. Then move to the front of the loom and move the lease sticks back up to the valet. Deal with sticky threads throughout. Difference #3.
  6. Repeat last step until all length is wound.

Difference #1:

  • For the first sample my warp went over the top of the harnesses, down under the front beam, then up & over the valet. (This is the path I’ve always previously used for my warps.) I used my wooden lease sticks in the first sample. They are shorter and if I tilted them just a bit they would fit between those chains on the Mac. As you can see, if they (almost) fit between those chains, those lease sticks are definitely not as wide as the warp, which is the entire width of my harnesses. So I had to make the warp narrower in the lease sticks than they would be in the reed. Also, I admit it, I’ve not taken the time to use really fine sandpaper and make my wooden lease sticks completely smooth – there are little ‘catches’ on them in places.
  • For the second sample wrap I used lease sticks I’d made from PVC pipe. These lease sticks are wider than the harnesses, so my warp could be spread as wide as it needed/wanted to be. In order to make the process work, I couldn’t narrow the warp to fit between those chains on the Mac. You can see in the photo (green arrow) that I moved all the heddles to the side and went through the center of the harnesses, not over the top. Also, the PVC is completely smooth – nothing to catch on ‘sticky’ threads, common to unmercerized cotton. You can see these PVC lease sticks in the photo by the purple arrow.

Difference #2:

  • In sample 1, because I used those short lease sticks, I needed to spread the warp in the raddle to the same width as it was in the lease sticks. This obviously crammed the warp closer than it needed to be. And since I was setting the warp at 30 EPI in the reed (40 EPI at the selvedges), it was close indeed in the reed.
  • For the second sample, with those longer lease sticks I could spread the warp to the width it would be in the reed. Plus, based on the feedback from my testing mamas, I was setting the threads farther apart to make the wrap thinner. I was using 26 EPI in the reed and 33 EPI at the selvedges.

Difference #3:

  • Dealing with sticky threads. Unpleasant. Unmercerized cotton tends to be sticky. When it’s sett as closely together as mine was, this compounds the problem. Actually, my problem may well have started before I got to the loom at all. When I was at the warping mill I did not have my finger between the two threads, keeping them separate the whole time I was winding. But I’m sure that wasn’t the biggest problem. That was likely caused by me doing what I’ve always done, even though I know it is definitely not recommended by other weavers: I combed my warp in an attempt to ‘unstick’ threads. This is how I was taught, but I’ve subsequently read a preponderance of weavers who strongly recommend never combing the warp, instead ‘strumming’ any recalcitrant threads while under tension to get them back into the same order they were in at the mill.
  • For the second warp I did keep my finger between the two threads at the warping mill. Also, I did not comb the warp. Combining these two changes with the ones noted above, the warp beamed super easily.

Let me know if you want more explanations.

All Tied Up

I got the solid cream warp, long enough to weave two baby wraps onto the Macomber loom. Here it is, all ready for me to throw the first shuttle.

tied on cream yarn

The amazing part is how long it took.

For that first sample warp, also long enough for two wraps, it took me 20 hours to get to this point; for this warp it took me 10.5 hours.

WHAT??!! Just over half the time?! How did THAT happen?

Start at the beginning. It took me 6 hours to wind that first warp, 3.75 hours for the second. I think a bit of that time difference was because I’m using a rented (and better) warping mill now, but I think more of the time was saved by winding with a single color. Every color change slows down the measuring process substantially.

Spreading the warp in the raddle – 3/4 hour each time.

Beaming the warp — here’s a real time saver. I said I was going to change my processes some and hoped that they both worked and saved me time. Did they ever! I went from 6+ hours with the first warp to 1 hour with the second. AMAZING!

Next step is threading the heddles. From 4 hours the first time to 2.5 hours the second time. I’ve thought about this. Sure, I was threading 130 fewer ends, but that wouldn’t save 1.5 hours! All I can figure is that I counted in that 4 hours the time I needed to move heddles around on harnesses and add those new heddles I’d bought, and in the right places. Early on I decided that I would thread all baby wraps in point twill; there are a HUGE number of tie ups and treadlings to change the weaving pattern. By always threading in point twill, I would not have to move heddles around. So from here on, that will be a savings. Unless, of course, I decide to weave something else – like a shawl – that requires me to change the heddles.

Threading the reed went from 1.75 hours with warp 1 to 1.25 hours with warp 2. That’s the result of 130 fewer ends.

Similarly, tying on to the front apron (what you see in the photo) went from 1.5 hours to 1.25 due to fewer ends.

I am THRILLED. Those first two wraps represented a HUGE investment of my time – a disproportional amount given the price I had quoted. As a result, I told all inquiring moms I wouldn’t quote any more prices till I had another sample wrap that (a) allowed me to improve my processes (it worked-YAY!) and (b) have more testing to see if I got the weight right.

Obviously that second part remains to be seen. I have to weave a wrap, cut it off the loom, wet finish and hem, send out to my testing mamas, and wait to hear from them. Based on their feedback I’ll either weave the second wrap as it exists on the loom or make changes to the number of ends per inch.

On ending and beginning

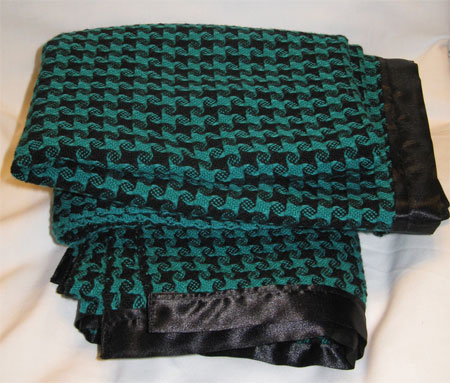
I got Summer’s baby blankets wet finished and binding sewn on. Then I got it with a stomach bug (thanks, R) that had me down – luckily only for 2 days – so the completed blankets sat waiting for me to get them in the mail.
Summer's handwoven baby blankets

As soon as I was able to do that, I started on my next project…another sample baby wrap. Two of my 3 testing mamas concurred that sample wrap #1 was too thick. That’s good news for me–reducing the thickness means fewer threads per inch, which means less time measuring, beaming, threading, and beating. Since I’d dramatically underestimated how many ends and picks per inch I’d need when I began giving price estimates, I was hoping this would be what I’d hear.

I gave a LOT of thought to what colors and weaving pattern I’d choose for sample #2, since it wouldn’t be simply an addition to someone else’s choices.

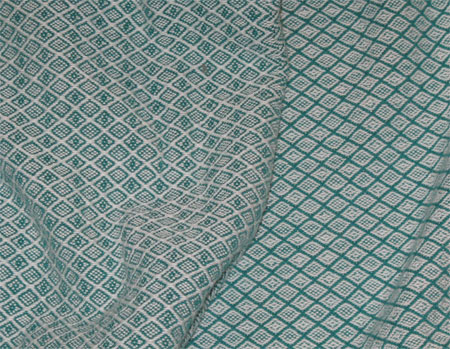
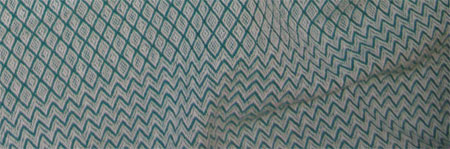
Finally the obvious answer struck me. I’m warping in solid cream. This way I can time how long it takes to measure a solid color warp and use that as a basis for my time & pricing when moms order multi-colored warps. I’m going to use the same threading as for the hearts pattern, but with a different tie up and treadling so I don’t get bored.

I’m setting this sample at 26EPI (34 for the selvedges) as opposed to the 30 & 40 I used for sample #1. If it’s still too thick, I’ll go down further, but I don’t want to drop too much too fast.

I thought I’d also wind this sample warp long enough for 3 wraps, planning to weave each one with a different solid color weft. Since my goal is to be able to warp for 3 wraps, best I do it with my sample than when I’m working on someone’s order.

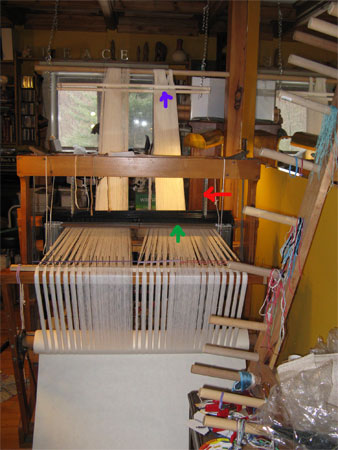
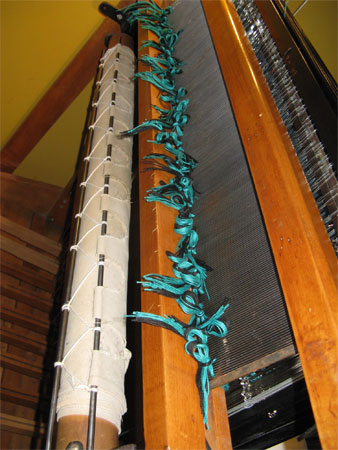
In the meantime, I rented a larger & more stable warping mill from the Rochester Weaver’s Guild. It’s pretty much identical to the modifications I think I want made to my own mill, so I figured I’d see if I was right.

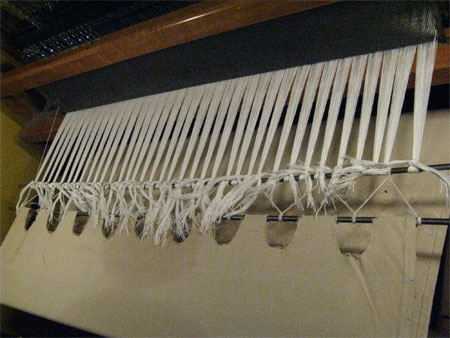
So I did all my math, and measured out my guide string at a whopping 737″ – about 20.5 yards. I wound my first bout (group of threads) that long, and could only get 100 threads on the mill before it was too full to proceed. It was definitely not easy to get that many threads that length, and it took far too long – an hour. At that rate, it would take me 8 hours just to measure the warp! And this without knowing if my improved beaming process would go smoothly for that length or if I’d end up cutting off a bunch of warp anyway.

So I made a decision…with my tools and equipment, I simply cannot warp for 3 baby wraps at once. Two is my limit.

I made the adjustment in length to my guide string – it’s still 511″ – a bit over 14 yards long. I wound a second bout of 174 ends in about 45 minutes, and with much more ease than the longer one. Then I figured I’d better do some more math and determine if my time really was more efficient with measuring the shorter warp. Yep. I got about 48 yards/minute (a rather bizarre thing to measure, I know) at the 511″ length and only about 35 yards/minute at the longer length. That confirmed my decision.

So I wound a third bout – again at the 511″, and had the same positive experience as bout #2. Now there’s no doubt that I’ve made the right decision. I’ve got about half of the threads for tester wrap #2 measured, and can’t wait to get it all ready for my improved beaming process — which worked like a charm on Summer’s baby blankets, but the warp was so short that it wasn’t a good test.

Stay tuned to baby wrap central as my warping, learning, and testing continues!

Pinwheels Redux

Summer's blanket threaded through reed

I got Summer’s 2nd blanket on the loom. As it turned out I had plenty of yarn to weave the second blanket, so the cones of aquamarine & black I ordered just in case will be extra. I’m sure I’ll use them up soon enough.

Then, because I’m not celebrating Thanksgiving with my family until Sunday, I got it woven and off. Next steps are to needle weave in a few ends, run a machine stitch along the woven edges, and toss them in the washer & dryer. When they come out I’ll apply the binding Summer’s requested.

On a holiday theme, someone told me that a special little boy would like an Elmo hat for Christmas. I found a few free patterns online. I took a some of this and some of that, knitting the hat itself and crocheting the features. I like the way it looks; I hope it fits him.

Elmo hat

Shhhhh…don’t tell Rusty!