I hear what you’re thinking…”Peg has a VALET? I thought she lived ‘the simple life’.”
But it’s true. I have a valet. Built it myself. No, it’s not a robot that responds to my beck and call, it’s a warping valet.
What, you may ask, is a warping valet? It’s a tool that’s designed to make it easier to wind a warp on a loom when you’re working alone. Which I always am. I’ve never had the luxury of having someone help me warp. Some fibers, such as shiny rayon, go on nice and easy. Others, like unmercerized cotton or rayon chenille, require lots of teasing, coaxing, and fiddling to get on the loom. Although it’s sure not common, I have spent literally hours on some warps trying to get them onto the loom without problems. Once I have practiced with my valet, this should become easier and quicker. And since I weave to sell, anything that makes the tasks easier and quicker is much appreciated.
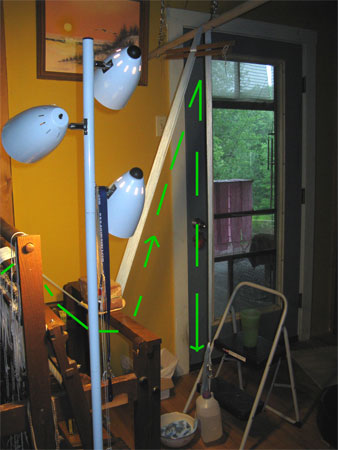
This is my first attempt at using my valet. Follow the bright green line to see the path of the yarn from the back of the loom, where it’s spread out in the raddle, to the chain in the bowl on the floor.

You’ll see I have it over my lower roller bars, under the breast beam, up and over the valet, weighted by about almost 1/2 gallon of water, and down into the bowl. The stool is only there because I’d just finished installing the chains and wanted to make sure I didn’t need to make more adjustments during the maiden voyage.
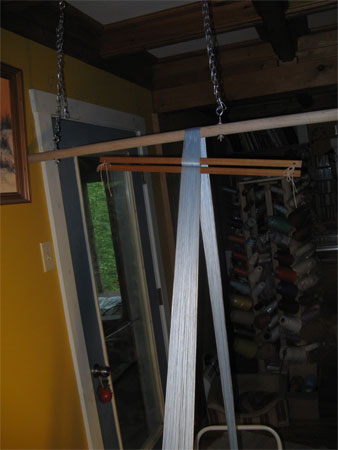
Here are a few other shots that will let you see my setup a bit better.

In this shot you can see the lease sticks up near the valet bar. As I wind the warp on the back beam, the water jug raises up and the lease sticks descend to near the breast beam.

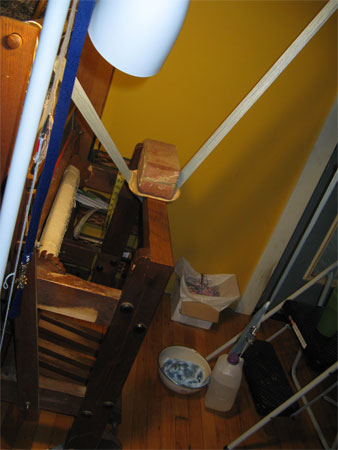
And’s here’s a shot of my temporary breast beam modification. This is a street brick (much heavier than a standard house brick) sitting on top of an old potholder so it doesn’t scratch the wood. Because my breast beam is quickly removed by a simple upward pull, it would not stand up to the tension of the water. I intend to make a more permanent modification to the loom and lose the brick, but I wanted to try this out first. For reasons that aren’t clear to me, I have a major hesitancy to make permanent modifications to either of my looms. So I want to make sure that this is the way the valet will work best for me before I break out the screw gun.
Although I’ve never met her, Laura Fry has taught me a great deal about weaving. She taught me how to speed up my weaving and retain great selvedges. She taught me the importance of the height of my stool (hips higher than knees, elbows at just above the breast beam). She taught me how to hold my shuttle correctly. And now she’s teaching me how to build & use a warping valet. She’ll be happy to teach you, too! Watch her youtube videos, buy her weaving CD, DVD and book, and by all means, read her blog. Laura’s a weaver who’s eager to share her talents with others.
On my first attempt, I must admit that it wasn’t totally comfortable for me. No surprise there – it’s a new process. My lease sticks kept going cockeyed, but mostly, it was a completely foreign experience to wind on that back beam under tension. I’ve never done it. I was concerned about the pressure it put on my little handmade loom. Then I realized that the same amount of pressure is applied the entire time that I’m weaving. Still, it felt very odd, wrong.
Once the warp was wound and the heddles and reed threaded, I could see a real benefit to the tension while warping. Tying onto the front apron rod has long been my least favorite part of weaving. I find it not only time consuming, but a place where I can really mess things up. If I don’t get the tension on all those threads right, I’m in a weaving mess. I can tell you it was rather a breeze with the tension-wound warp.
Granted, I did my first run with rayon, which is easy to warp anyway, but still, I’m counting it as a success. With practice and my own modifications for my specific setup, I’m confident I’ll like this valet.
Thanks again, Laura!


Oh Peg, you’ve GOT to try the 2 stick method. My little table loom wasn’t sectional either, just used a valet to keep strong tension. I’m a newbie at this so I’m looking for all the tips and tricks I can find.
There’s no danger of having to re-sley anything. And it’s much safer. The two sticks are woven into the material in FRONT of the reed. They can’t come out! You just loosen the warp, cut, fold the sticks over one another and tie back on with 3 cords and you’re on your way! No lumps, no bumps, just a flat surface. And the tension is kept exactly the same.
http://peggyosterkamp.com/2014/05/favorite-weaving-technique/
Once you read thru it… the logic just compels you! I just tried it to get rid of the lumps caused by the knots, but once I tried cutting off in the middle it was a revelation. WOW this is EASY!
I just recently sold my table loom and got an Artisat 36/4. So now I’m teaching the feet to dance. I figure it’s like switching from a piano to an organ! Now, the devil in me is saying, “wonder what 8 shafts would be like!” LOL
All the best Peg.
I definitely respect Peggy Osterkamp and have have read through the 2-stick method, but I still don’t feel compelled to do it. I VERY rarely need to cut a warp off mid-stream and don’t generally have tension issues. Plus, I just got Katie Meeker Reed’s book and am going to try her methods for tie on and live-weight tensioning for my next warp. 🙂
Hi Peg,
I’ve tried this method of warping. My valet wasn’t as high, but it worked nonetheless. I did a small table loom which I had to ‘clamp’ to the table… but it worked great. I’ve also used the 2 stick tie on method lots of times with great success. It’s a great technique for being able to remove a project from a loom without having to resley. Google “peggy Osterkamp a favorite weaving technique”.
All the best
Thanks for the info, Tom. I do know about Peggy Osterkamp’s 2 stick header, and although I haven’t used it myself, I know some other weavers swear by it.
If I have to remove a project from the loom, I do it slowly & carefully so I don’t have to resley, but since I don’t do sectional or continuous warping, my longest warps are about 18 yards and I don’t often have to cut off only a piece of it.
Wow! So Cool. Great idea. If you used the same warp a lot, you could make a continuous warp out of this method. It’s a simple conversion. But again, it requires that you use the same warp thread combination for a long time.
http://www.hand-woven-rugs.com/converting-loom-to-continuous-warp.php
Thanks for the comment and the link, Tom. I’d never heard of continuous warping before, and it’s not something I’m personally well suited to, but it’s a very interesting concept.
Peg, I have to admit you speak foreign languages very well – at least to my ears. However, being a quilter, I can appreciate that keeping tension during certain phases eases the going considerably. Rube Goldberg I ain’t, but I really like what you’ve built!
Keep going, girl!
Hi Peg – it makes things a little easier if you have shorter lease sticks for narrow warps during the winding on process. Then when I transfer the cross behind the reed, I use the longer lease sticks which are held in place by the ‘angel wings’. 🙂
I hear you about it feeling ‘wrong’ – when you’ve been doing a process one way for a long time it is very uncomfortable to change the system radically! Remember – 7 warps to unlearn the old muscle memory and create the new. 😀
cheers!
Laura
Thanks, Laura. My warp was 9.5″ wide, but because it’s spread in the raddle at the back of the loom, it narrows itself down considerably by the time it reaches the front of the loom. I’ll try making a set of shorter lease sticks – maybe. Time is always the issue, and I don’t claim to be a woodworker, particularly since smoothness is of major importance for lease sticks. I could make a short set from PVC, but that’s not the same thing at all as wooden ones.