Archives

FIFI

The Buffalo Weavers’ Guild, of which I am an out-of-town member, has a regular program called FIFI – Find It, Finish It. A great concept.

Although I didn’t need to find these things, I did manage to finish a few things recently. First the unexciting but necessary.

windows ready to paint

Of those 12 casement windows in my weaving studio, several had issues. The frames had apparently been painted with the wrong type of paint, or painted at the wrong time of year, or not allowed to dry thoroughly before being closed, or something. When I opened those windows in the spring, paint remained on the inside of the frame, leaving the wood on the windows bare in spots. I did my research on the type of paint I should use, sanded the frames for the 5 worst windows, taped up the glass, and set to painting them. I used Snap Dry from Sherwin Williams. Pricey stuff! Sure glad I had a 30% off coupon. But what was I thinking when I bought a whole gallon?

Anyway, I put 3 coats of the paint on over the course of 2 dry days on the 5 frames, left the windows open for a few days of warm, dry weather, and then shut them a few days ago when the temps dropped dramatically. I’ve opened them a few times to see what’s going on, and so far, so good. The truth will be what happens in the spring after they’ve been shut and locked for months.

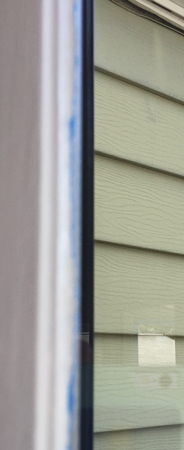
I do have to say that I was less than enthusiastic about the blue tape. As the directions said, I removed the tape as soon as I was done painting. I got a bunch of areas like this, where tape remnants had to be carefully removed with a razor blade. (Sorry for the fuzzy photo.)

blue tape residue

The other 7 windows weren’t in bad shape, and I decided I’d see how those 5 were in the spring before I tackled the rest.

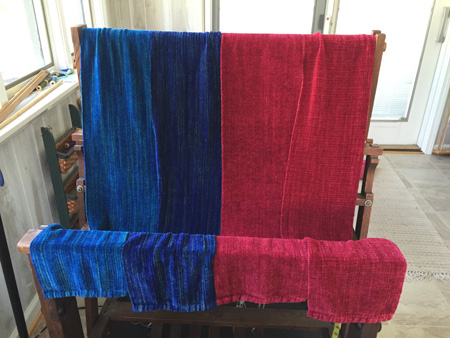
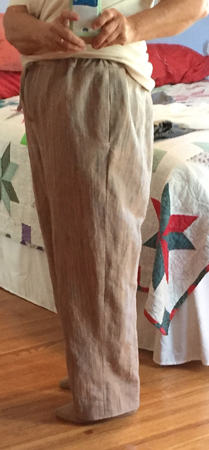
But here’s the finished AND exciting part. Look!

handwoven pants

My pants are done! They are not perfect, and I’d make changes to the pattern for the next time, but I am reasonably happy with the pants.

Before I tell you about the process, I first want to send a HUGE thank you shout out to Theresa over at Runamuck Weaving. She’s an INCREDIBLY kind and helpful woman, and I sure hope that one day one of us will travel to the opposite coast so we can meet in person. Right now Theresa can use lots of our positive energy due to some difficult times she’s facing, so send her your kind thoughts.

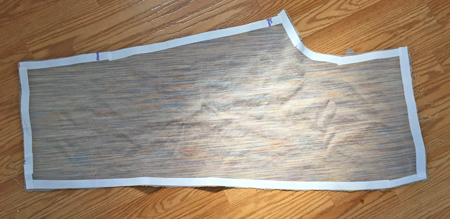
Anyway, to start, I had to spend many evenings very carefully taking apart those horrid failed pants. Then I got myself some 830 Pellon to use for making my pattern from the pants I really like. Cut that pattern out of muslin, sewed them together, and the pants weren’t right. Thigh, waist, and crotch all too tight. Theresa offered her long-distance suggestions on how to improve the pattern.

I didn’t have enough muslin to move forward, so had to make another trip to the store. Then I revised the pattern and repeated the process. This time the crotch and thigh seemed right, but the waist was way too big. Back to Theresa, who offered advice on improvement.

Modify the pattern and the pants again. I have photos of those steps, but I’m not going to bore you with them. It seemed really close, and the reality is that every fabric works a bit differently, so I opted not to make another pair of muslin pants, but to move forward with my handwoven.

Theresa and a woman from my Guild who sews with her handwoven fabric both strongly recommended that I use the lightweight iron-on adhesive (Heat & Bond) on my seams and cut edges. (NOTE: In hindsight, I think I got the wrong stuff. I think I was supposed to use light iron-on interfacing, not adhesive. Oops!) I couldn’t find it in strips, so had to start by cutting long strips of the stuff, then ironing it on every edge of every piece. Time consuming, but not hard.

pants leg with protection

After this, however, apparently my brain left my body for a while. I pulled the paper (the white that you see) off the all the leg pieces of those pants before I started to pin them together and sew. It made quite a mess on the floor, so I crumpled it all up and put it in the recycle bin. BAD MOVE! The sewing machine would not move the fabric forward with the resistance of that iron-on stuff. I had to pull it out of the garbage and use a combination of that and tissue paper, pin it to every seam, and then commence sewing. I must say, pulling either the paper or the tissue off after sewing the seam was one more time consuming step, with varying degrees of difficulty. I am positive that I’ll have some paper bits in those pants for a long time. Much like the blue tape residue on my windows.

handwoven pants from the side

So I sewed. I had a few issues, one being that I couldn’t save the first waistband, and didn’t have enough fabric to cut a new one in one piece, so had to fart around a bit and design a new one in two pieces, with side seams. I was smart enough to not remove the paper liner from those pieces till after they were sewn! 🙂

Next, and I knew this would be a problem, when I cut those pants the first time I didn’t make them as long as I should have. Since I wanted long pants, not crops, I knew I’d have to make a tiny hem. I ended up deciding to fold once, very small, and press that adhesive together, then machine stitch. Never would have done this otherwise.

I also decided that with that iron-on adhesive, I would not also take the time to otherwise protect each raw edge with zigzag stitch. This may prove to be a real mistake, but I don’t think these pants will last forever regardless, and they don’t fit exactly like I want, so I’m okay with that.

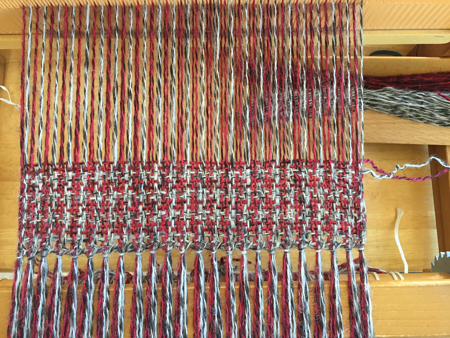
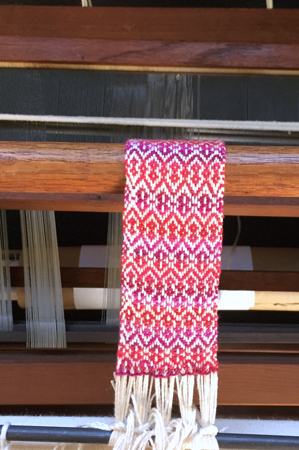
I’m going to happily wear my new pants, sewn with my own handwoven cotton & linen fabric, when I do my demo at the Library on Saturday!

Live now

evening sky with contrails

“None of us are getting out of here alive, so please stop treating yourself like an afterthought. Eat the delicious food. Walk in the sunshine. Jump in the ocean. Say the truth that you’re carrying in your heart like hidden treasure. Be silly. Be kind. Be weird. There’s no time for anything else.”

Christopher Walken

True, Mr. Walken, true.

Save

Mary Poppins lied

yucca threads

cool threads on a yucca plant

I have no comment on the spoonful of sugar thing, but when it comes to washing windows, well begun is most definitely NOT half done. Only half done is half done.

section of my walk on Bay Road

nice section of my morning walk-what’s around the bend?

When you have 22 windows to be washed, inside and out, and screens scrubbed, it takes hours to reach half done. I forgot about 2 of my small windows when I did this nasty task on Friday, and still have to wash the insides of the dozen windows in my weaving studio, but this is small potatoes compared to what I have finished.

I have now finished those windows, and the fat lady has sung her closing aria.

next section of Bay Road

the road opens up to the Bay

Bay road pilings

cormorants drying their wings on the pilings

In a few weeks I’m going to be doing a demo at the Rochester Central Library. I’m bringing 3 looms: my potholder loom, on which I’ll invite people to make a potholder to take, my rigid heddle loom which I set up with an alpaca houndstooth,

alpaca houndstooth on rigid heddle

and my 4 harness Missouri loom, which I’ve set up with cotton for a bookmark warp.

bookmark warp on Missouri loom

I have a few weeks to gather the supplies and materials for this program, but wanted to get this part set up and off my to-do list and my mind.

Harking back to the last post, my 2nd and 3rd little melons were ABSOLUTELY DELICIOUS!! I let them simply fall off the vine on their own instead of picking them…a good decision for me.

Not rushing

section of my show booth
In my life, the same fact or occurrence is often both the good news and the bad news, just like our greatest strength can also be our greatest weakness. My sales, like every other artist I spoke to, were poor at the show this past weekend. That’s the bad news. The good news is that I was able to come up with a very long list of things I was grateful for regarding this show. Here are just a few highlights of that list:

  • I could sleep in my own bed every night, rare for shows for me.
  • It was my last outdoor show of the season and I put my tent away dry!  I’ve usually had to set my tent up at home after the show to dry things out – a real pain in the butt.
  • I won’t have to worry about weaving inventory for shows until at least next summer.
  • I’ll have plenty of time to weave what moves me – like maybe a rug for myself, a baby wrap for my daughter, and more yardage for clothing.
  • I’ll be able to devote some serious time to working on that Certificate of Excellency.
  • I can have lots of fun doing more hand painting, coming up with some ideas for holiday gifts, and playing with my grands.

wispy clouds

I can take time to stop and smell the roses…and maybe get out my book and see if this sweet wild thing is a foam flower – the only name my brain is providing but I don’t think it’s right.
foam flower?

I can revel in the fact that the first melon I ever grew looked just beautiful, even if it didn’t taste quite as sweet as it looked.
my first melon, cut

I can really enjoy how sleek Jack’s new ‘do is. His first professional cut since I’ve had him, and SOOOO much better looking than the job I do with scissors.

Jack's pro 'do

Do you see who he’s protecting there? It’s Fishy, who looks worse with each passing day. But Jack so prefers him over Owl. One day soon Fishy is going to have to simply disappear before he disintegrates into rubbery bits on my floor or in Jack’s stomach. Should I say he went to live with nice people on a farm in the country? 😉

New Techniques

Warning: this is a long post with lots of process photos. Proceed at your own risk.

Before I wove those great color block towels I had purchased 2 large cones of Georgia-grown and processed cotton. I hadn’t realized just how large they would be till they arrived. Here they are with two of my ‘regular’ cones of cotton, each around 1/2 pound, for comparison.
two big cotton cones

I bought the cotton for 2 reasons: I loved the fact that it was grown and processed right here in the United States, and I wanted to do some more hand painting with a fiber that would be more affordable to potential customers than the silk.

First up was trying a new-to-me technique – dyeing the warp for a cotton shawl in the same colors, but with sections offset partly or in whole. Of course I had to be begin by measuring out the sections of warp, scouring it, and soaking it in the dye activator before I could start dyeing.

Let me say right off that the bed risers did, in fact, raise my table to the perfect height for me to work on. HOWEVER, I have learned my lesson with this job. I will NEVER AGAIN do my dyeing outside for this type of dye job. (It was relatively simple when I was dyeing one warp at a time for the scarves.) It takes only the faintest breeze to make handling plastic wrap insanely challenging, and it felt like I needed to use miles of the stuff for this job. For each time I covered the length of the table, which I think was six times, I needed four widths of the plastic wrap. So lay down a length of wrap the 6′ of the table, attempt to hold it in place while I laid the next length next to it, and so on. Needless to say, by the time I’d gotten to the 4th length nothing was straight and even any more. I was frustrated for sure. Wishing I had octopus arms and hands with lots of fine-motor control and patience.

Here’s the first length of the 6′ table when things were relatively in control. Seven sections of cotton – needed for the width of the shawl – laid out and painted.
painting shawl sections

After each 6′ length was painted I had to roll it up the length of the table, again cover the table with the plastic wrap (grrr), then lift the already-painted roll up over the newly-covered table for the next 6′. So in addition to the wind, as you can imagine it became increasingly difficult to lift the already-painted roll up over the newly-covered table as it became heavier and heavier. Again wished I had octopus arms and hands, this time strong ones.

After I had it all painted and rolled up, I set the whole thing in a tub to batch – or set in warmth to get that dye to bond with the cotton fibers. Since I could certainly not fit this into my steamer, I decided to leave the tub in my garage, with the door closed to really build up the heat, for two days. I thought it looked like a caterpillar, one that might even be recognizable.

painted caterpillar warp

After two hot days I carefully unwound the big roll, dividing it into three tubs to keep the lengths from getting irretrievably twisted.

3 tubs of painted cotton

Then I draped it across my clothesline to dry. It took almost 40′ to spread it all out.

hanging the warp to dry

Here’s a tub full of the dried yarn. You can see how much lighter it is dried than it was wet. I still have to get used to this in choosing my dye colors.

1 tub of yarn dried

Finally I could start getting this warp on my loom so I could get some real idea of how it looked. I decided to do about 1/2″ on each selvedge with some solid color cotton I had so I didn’t have to worry about selvedge breakage like I did for those towels.

beaming the shawl

Once on the loom I auditioned several wefts. It seemed like I had plenty of choices.

auditioning wefts

I decided on a lavender cotton for the first shawl. I am loving the way the colors gently bled along the length of the cotton for such nice transitions.

loving the color transitions

Enough of the process. I wove all three shawls, fringed, washed, and dried. I still have to do the hard press, but the conditions were right to get some photos so that had to wait. First up is the shawl with lavender weft.

hand painted cotton shawl, lavender weft

Woven next was a shawl with a dark purple weft.

hand painted cotton shawl with purple weft

And finally I used that lovely undyed cotton for weft.

hand painted cotton shawl, cream weft

My daughter says the shawls, especially the dark one, remind her of a long-standing Rochester event, the Lilac Festival. I think I’ll use that for their name.

Just quickly, while I was waiting for the dye to batch and then set, I wove four rayon chenille scarves. That was before I knew that it would be warm the weekend of the Clothesline Festival.

red and blue rayon chenille scarves

So I’ve ended up with 9 new shawls and 15 new scarves. Not bad. We’ll see how the show goes.

Parting shot: one of Jack’s favorite positions when the temperatures are in the 70s.

one of Jack's favorite positions