Archives

Not Again!

Laura Fry recently blogged about how her hands forget exactly how to move when she’s been away from her loom for too long — which can be just a few days, really. Since Laura’s one of my weaving idols, I guess I shouldn’t feel too bad when I make a bonehead mistake.

Again.

I do take some comfort in the fact that I’m not repeatedly making the same bonehead mistake.

This time I did all my usual math to calculate how much warp to measure for Summer’s custom ordered baby blankets. And then I apparently completely ignored that paper.

I measured 540 ends too many. But I measured all 1,280 ends too short. Summer ordered 2 blankets. I have enough warp on the loom to weave one, then I’ll have to measure out another 200 ends and rewarp my loom. What a colossal waste of time.

Nothing I can do about it except learn from my mistake. I’ve ordered more of the cotton to make sure I don’t run out in the middle of blanket #2, which I think would be completely possible given my screw ups.

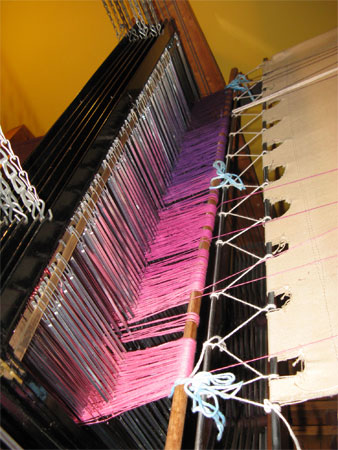
Anyway, blanket #1 is working up quite nicely.

handwoven cotton baby blanket

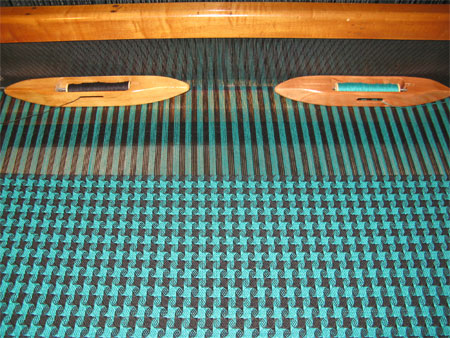
Summer chose black and aquamarine woven in a pinwheel pattern. I had to work at the beginning of the warp to get my beat right so that the pattern’s square — you can see that it’s too long at the beginning of this photo. It’s good now. The colors remind me of a baby blanket I wove last year in cotton flannel.

I’ll measure how much I need for blanket #1 and then measure the length left on the loom, but I’m pretty sure it won’t be close to enough.

Since I had to order more yarn for Summer’s second blanket, I figured I might as well order enough for the next few baby wraps at the same time. I ended up ordering 61 cones of cotton!

Happy Thanksgiving – and/or Thanksgivukkah — to everyone!

happy thanksgivukkah

Beading Intermission

While I was waiting to hear from my first sample-testing-mama about the wrap, I decided I’d make a beaded ornament. I haven’t made any since last year, and then I didn’t have time to make any real fancy ones. I like to have them for the December Roycroft show.

pink & silver Victorian ornament

While there are similarities for sure, I design each of the ornaments individually. I’m pretty much forced to, since beads aren’t all exactly the same size – at least my beads aren’t. So the number of beads that is just right when using bead A is different from the number of bead B.

Getting step 1 done – to the black arrow – wasn’t too bad. I just had to figure out how many beads would go around the top, then how many to make it to the middle of the glass ball, making sure I had the number of hanging ‘strips’ that would work out for step 2.

pink & silver ornament 2

Step 2 – to the blue curve – is standard beaded netting. All I had to do was figure out how many beads I needed in each section to hang down to the length that made sense to me. I did a 1-2-3-2 pattern, so the end was scalloped, with 1 being the shortest and 3 the longest.

Now for the last section, step 3, the part that would make the ornament special. I tried at least six different arrangements before I found one that I liked. That means string beads for at least one whole section (1-2-3) then take them out. Try a different pattern: string beads take out. Repeat at least four more times.

That’s why when people ask me how long it takes me to make an ornament I honestly have no idea. If I kept track of the time I’d have to charge a ton of money for each ornament, so I don’t keep track. Ya gotta love making these or there’s no point.

Up Against It

You make one mistake and it leads to more problems than you thought.

Back when I was weaving the sample wrap, I used one extra safety pin/marker, weaving 20″ more than I wanted to. When I finally figured out what I’d done, my first thought was that I wouldn’t have enough warp left to weave Meghan’s ‘real’ wrap. I went to my record sheet and said, “Whew!” I’d have enough warp and some left over.

Again, Hah!

When I did that math I didn’t take loom waste into account. There’s thread wasted at the beginning of a piece when you tie it to the loom and thread wasted at the end. I kept my beginning waste to a minimum, although I could have lashed on instead of tying on and made it even less. But no need to…I had enough.

Till I got to the end. I kept advancing the warp farther and farther, and finally it was about 3″ behind the last harness.

up against it

With the end of the warp so close I couldn’t get a good shed anymore. I used a yardstick to separate the threads and stood it on end behind the reed to make a better shed. I wove until I couldn’t fit my shuttle through the shed anymore. Still, I was almost 10″ shorter than I wanted to be. Damn, damn, Double Damn!

Nothing I can do but email Meghan and tell her. She’s an extremely rational woman and suggests a great approach. After I’ve wet finished, pressed, and hemmed the wrap I’ll mail it to her. If it’s long enough for her, great. If not, I’ll weave her another, on a priority basis.

Amazingly, the finished wrap ended up being 180″ long, just an inch or two shorter than I wanted. All my frustration and time consuming fussing at the end of the warp was worth it.

Meghan's wrap, folded

It’ll go in tomorrow’s mail to Meghan.

Today I spent an ungodly amount of time figuring out how to get my computer to print in mirror image so I could print on transfer paper, ultimately making the mandatory permanent labels. I’m not sure they meet all the federal requirements…I’ll change them if I need to.

I also got the warp measured for a special order of two baby blankets. You’ll see them in the next post.

The Real Deal

Meghan, my first baby wrap order and first sample wrap tester, has done her 5-day test and passed the sample wrap on to mama #2. Although she initially thought she wanted the wrap a little lighter in weight, Meghan decided that she wants me to weave her real wrap at the same sett.

I started weaving today, using Meghan’s chosen black linen weft.

Meghan's wrap

I figured it would take the same 15 minutes to weave 7″ that it took with the cream cotton. Hah!

Linen is trickier, even as weft. With almost each toss of the shuttle across the width, the linen yarn unwound too much and ended up tangling around the end of the pin. Futzing takes time, slows down the whole process.

After I’d woven about 50″ I finally figured out how I can do an extra move with the shuttle at the end of each row to minimize the problem and speed up a bit – I’m now approaching 7″ in 15 minutes.

I ran out of steam after about 80″. Tomorrow’s another day.

Clasping Rainbows

At this time of year I am thinking about 2014, about the shows I’ll apply to and the work I’ll submit with my applications. Most shows want images from the last two years, so I don’t HAVE to take new photos this year for most shows, but I still want to get some new ones.

To retain my status as a Roycroft Artisan, I do have to submit new photos annually, and to have actual work juried, too. Last year I didn’t give enough consideration to the work I’d submit for hands-on jurying, and I don’t want to make that mistake again.

So I’ve been thinking about what I will submit…all of which needs to have been created within the past year, and which must show that I continue to grow in my skills. I’ve decided that I want to submit a clasped weft piece, and that I wanted to do a take-off of my rainbow shawls, something that was reminiscent of them, but in a scarf and using clasped weft.

I prepared a warp for three black rayon chenille scarves.

For the first scarf, I used the same technique as I had for those last clasped weft scarves, throwing two picks of black between every clasped weft pick. I used 10 colors, with 7-9″ of each color.

clasped weft handwoven scarf, single rainbow

It turned out well, but I thought I wanted more color, so I wove the second with every pick being clasped weft and the picks ‘connecting’ to form graph-like shapes.

clasped weft handwoven scarf, bright rainbows

This one turned out well, too, but I wasn’t sure I wanted to repeat it for the third scarf, so I did a morph of the two. I did clasped weft every pick, but used more of a ‘line’ technique for the adjacent picks instead of the ‘graph-like’ technique. I also did a double rainbow, with about 4.25″ of each color up to purple in the middle and then reversing the colors.

clasped weft double rainbow handwoven scarf

I like this one, too.

Here’s the thing…for wearing, I like the middle one best — the colors show up the most. For looking at for jurying, I like the last one best – EXCEPT there’s a problem with it. The pale green I used in the first half ran out about 3/4 of the way through that section of the second half. DAMN!! I unwove those 3+ inches and used the closest color I had, but it’s not identical. I think that will be noticeable enough to the RALA jury that I shouldn’t submit it; I should weave another one with this pattern. DOUBLE DAMN!!

I also am inspired to try a black & white scarf, weaving in what I’ll call a cityscape scene. The buildings won’t be able to have any windows in them (they’ll be solid black or solid white) but I think it will look good. I never know until I sit at my loom & try. Watch with me as this clasped weft adventure proceeds.