I’ve never done anything like this post before – writing directions on how to make something and taking pictures as I go. Some of the photos are a little bit fuzzy – of course I didn’t know that till I was all done :-(.
Before we start, I want to thank Cathy Powers, the talented woman from my fiber arts guild who taught us how to make these buttons at our February guild meeting. Cathy requested that this button be named Isa’s Button, after her mom, who taught Cathy this button-making method. Thanks, Isa, for a beautiful button!
Ok, gather your supplies. You’ll need a lid from a cottage cheese container (or similar), a pair of scissors, a pen (a fine line Sharpie works great), and a straight edge. A compass can make it a bit easier, but aren’t essential. Later on you’ll need yarn, a yarn needle, and a button.

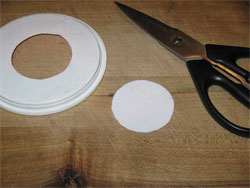
1.) Draw a circle on the cottage cheese container. This will be the template for your button. You can make yours larger or smaller than mine, depending on what size you want your finished yarn button to be and what size yarn you use. My circle is about 2.25″ in diameter.

2.) Cut out the circle. Find the center of it — this is easier if you used a compass, but do-able if you didn’t. (Let me know if you didn’t use a compass and need help to find the center.)
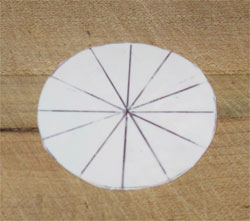
3.) Draw lines on your circle, directly through the center. You’ll want 12 lines. (Note that this isn’t written in stone. If you make a small button, you may want only 8 sections; for a large button, you may want 14 or more.) You’ll see that my lines aren’t entirely even. This isn’t ideal, but it’s not completely critical.
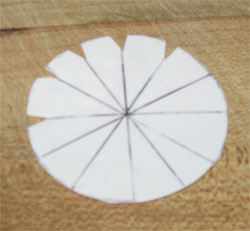
4.) Cut a little V out of each section, using the lines as a guide.
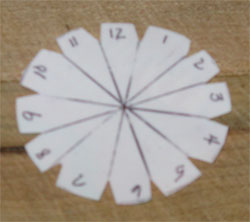
5.) Number the sections of your template, as if it were a clock. Carefully poke a hole in the center of the template. You can use the point of your compass or a sharp needle – your yarn needle isn’t sharp enough.
6.) Cut about 4 yards of yarn (I’m using and 8/4 cotton for my sample), and thread it through the yarn needle. Now thread it through the template, from the underside up to the side you’ve numbered. Leave a tail of about 4″. You’ll be working with a single strand of yarn from here through step 9.
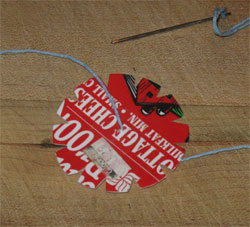
7.) Your yarn is coming up through the center. (From here on when I refer to the slits, I’ll use the number to the right of the slit. Refer to the picture to see what I mean.) Now bring your yarn over the top of the template and through slit 12. Bring it behind the template and back to the front through slit 1. Carry it directly across the template to slit 7.
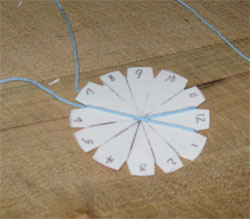
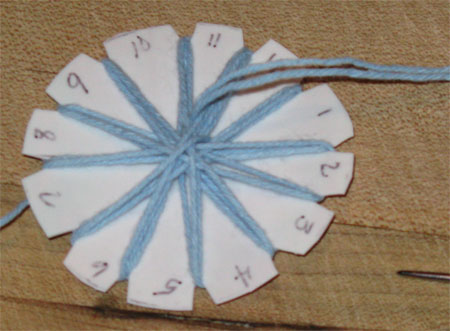
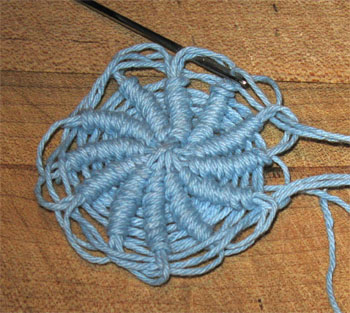
8.) Continue wrapping in this pattern: behind the template and up at 8, across to 2. Behind 2 to 3, up at 3, across to 9. Behind 9 to 10, up at 10, across to 4. Make one complete rotation around your template this way, making sure to cross the center of the template every time you go across the front.

The back will look like this. (Actually, this is after mine is wrapped twice. I forgot to take a picture of the back earlier on in the process.)
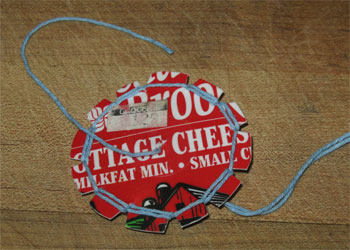
9.) Go around again, following the same pattern with your yarn.
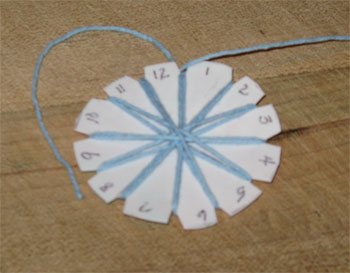
Now you have to make a decision. Should you go around a third time or not? The answer really depends on the size of your yarn and the size of your template. I decided to go around mine a third time, resulting in 3 threads in each of the slits of my template. These 3 threads form spokes.
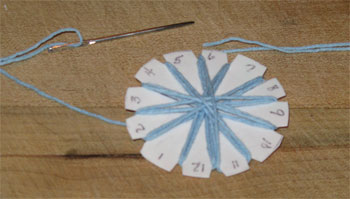
10.) Now you’ll start wrapping those yarn spokes. To begin, move your yarn needle to the center of the yarn, so that you will be working with a double strand of yarn from this point forward. If you followed the same pattern of making the spokes as I did, you’ll end up with your yarn coming up through slot 6. So go across the template to spoke 12. (If you didn’t end on 6, simply adjust by going directly across the template to the opposite number.) Go under spoke 12 with your needle and pull your doubled yarn through. Tuck the loose end under the center of your work.
11.) Now go back under spoke 12 and also under spoke 11. The first pic below shows what your work will look like with 2 wraps done. The second pic below shows what your needle will be doing when it’s going under 2 spokes. Again, I forgot to take a picture of this step earlier. Be sure you’re going under all the threads in each spoke, not just one or two of them.


12.) This is rather like an embroidery back stitch. Every time you’ll go back under the last spoke and under the next spoke. Keep doing this until you get all the way around, back to spoke 12. (You’ll have gone under both 1 and 12.)
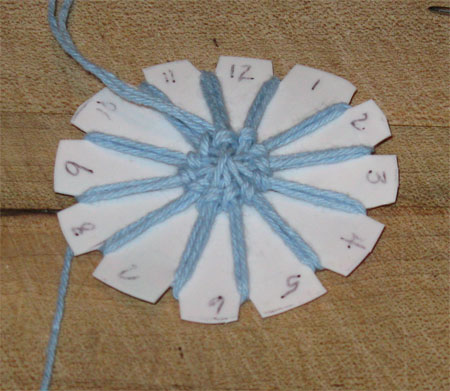
14.) Keep going around until your template is pretty full. If you’re running out of yarn, don’t panic. Simply push the needle with the yarn on it down through the center hole of your template from front to back. Now thread more yarn onto your needle, and poke it up through the center from the bottom, keeping another tail on the backside. Be sure you’re working with your new thread doubled.

While you’re wrapping, watch out for these errors:
catching the yarn on the edge of the template…

…or having one loop of your yarn too loose.

15.) So now your spokes are all wrapped and your template is filled with yarn. It’s time to remove the template. One at a time, gently bend one edge of the template up a little bit and slip the yarn from the back of the template off.
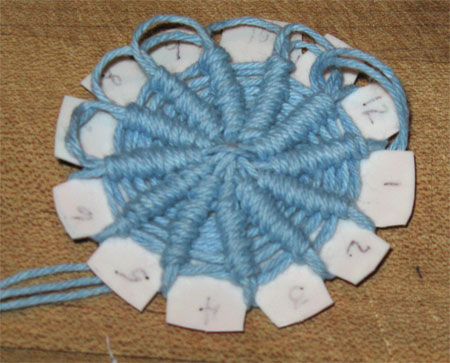
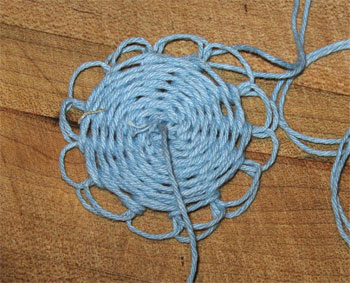
Keep going around the template until all your back loops are loose. Your button will have a daisy-like appearance at this point.

16.) Now gently pull the button off the template, pulling your initial 4″ end of thread through the center hole.
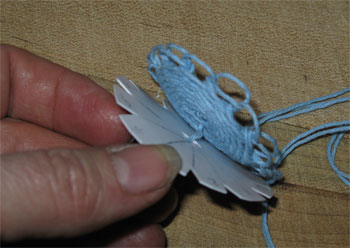
Here’s a front and back shot of your button at this point.

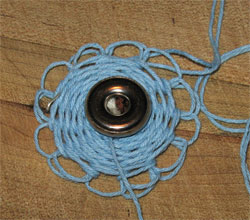
17.) Now choose the button you’ll use for your base. It can be metal, plastic or wood. It can be a button with holes or a button with a shank. It can be old and ugly, as long as it’s not dirty or rusty. Your button should be at least half the size of your yarn daisy. Set the button aside for the moment.
18.) Starting on the outer loop that’s closest to your needle, go down through 1 loop and up through the next. This is like an embroidery running stitch.
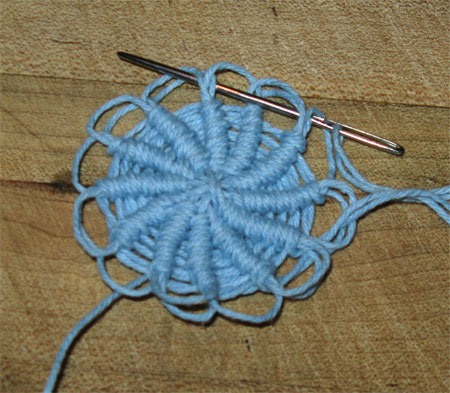
19.) Go all the way round with those up and down running stitches till you get back to where you started. Don’t pull anything tight — keep it loose.
20.) Now flip the yarn over, and hold the button in the middle of the back of the yarn daisy. Tuck that beginning 4″ tail under the button.
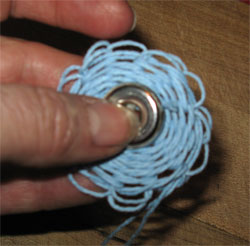
21.) Here’s the exciting part. Gently pull on the yarn you threaded through those daisy loops, and your yarn button will start to take shape, forming over the base button.
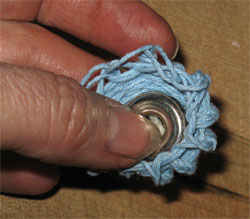
Keep pulling until the yarn closed around the base button.
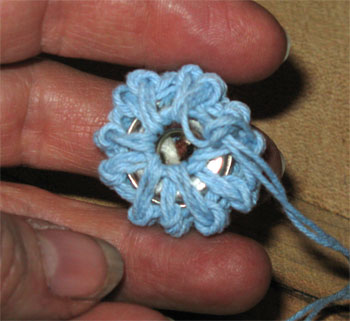
Pull more until the yarn is quite snug. Finish the yarn by tying a knot. Leave the end.
Flip it over, make any adjustments you need to center everything, and YOU ARE DONE! You can use the remainder of the yarn to sew the button to your garment.
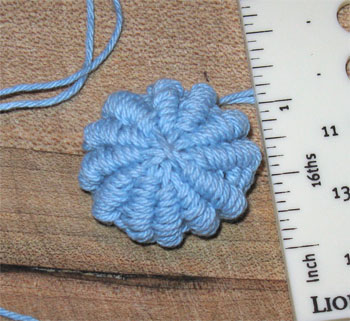
Congratulations on your lovely yarn button!
You can see that using a 2 1/4″ template and a medium weight yarn, I ended up with a button that’s about 1″ in diameter.
Once you’ve got the hang of it, you can add your own touches to your button – changing colors, threading a few little beads in the center, whatever floats your boat.
If my instructions aren’t clear, or if you have any questions, don’t hesitate to ask. After you’ve made a button, I’d love to see a picture of it!
Join the V7N Challenge – learn something new every day


What a clear and concise tutorial. Your photos are excellent and with the written instructions are easy to follow. I plan on making my template and trying my first Isa button. Amazing that a 2.5″ template yields a 1″ button.
Thanks. Enjoy making buttons!
Perfectamente explicado. Muchas gracias
Thank you.
Thanks for this. 2022 and your tutorial is still inspiring people, well me, to make these buttons. I will call them Yorkshire buttons as I’m from Yorkshire! Eee bi gum?
Thanks, Jean. The woman who taught me how to make these buttons called them Isa’s button. Isa was her mother (or maybe it was her grandmother?) who taught her. I have since learned that they are correctly called Yorkshire buttons. Have fun making buttons!
Thank you so much for your patience in giving each step necessary! I have wanted to make these & tried to make them with no pattern. I am excited & want to stay up all night making these gorgeous little treasures. Bye for now & thanks again…
Thanks, Morag. Enjoy this version of a Dorset button. There are SO MANY versions out there! A great book is Buttons: A Passementarie Workshop Manual by Gina Barrett – hundreds of kinds of handmade buttons in it.
Muchas gracias!!! ?
Dorset buttons are made round brass rings, these are Celtic buttons, made in Scotland and Ireland, so Perth and Kinross, Ross and Cromarty, and the like, thank you so much for sharing, as my mother used to know how but forgot and is now long dead.
Thanks for your comment. I’ve since learned how to make Dorset buttons, although these days most people (including me) are using plastic rings. There are SO MANY types of buttons made from yarn or thread. My Guild recently bought a book that has hundreds of buttons and directions.
We made these for our sweaters in the late ’50s, and called them Teneriffe buttons. Back then we used cardboard from cereal boxes as the “loom”.
Thanks, Irene. Never heard of Teneriffe, but just googled it and there it is. The woman who taught me called them Isa’s buttons as Isa was her mom, who taught her.
Thanks for tutorial to remind me how to make the buttons. I learned how to make them many years ago at the ‘Rural ‘ in Scotland. I was told they were called P & K buttons ( Perth and Kinross ) after an area in Scotland. Looks like they get named differently in the various areas in which people live or after the people who happen to make them at the time. Regards.
Thanks, Margaret. Isa was the mom of the woman who taught me. I’ve also heard them called Dorset buttons, so I think you’re right about them getting named differently over time.