Archives

Calm before the storm

The last two days here in Western New York have been so amazingly beautiful, so warm and lovely, that it’s hard to think about the Frankenstorm that’s coming. Too hard to stay inside the house, even when there’s tons to be done to be ready for my next show.

How to solve this dilemma?

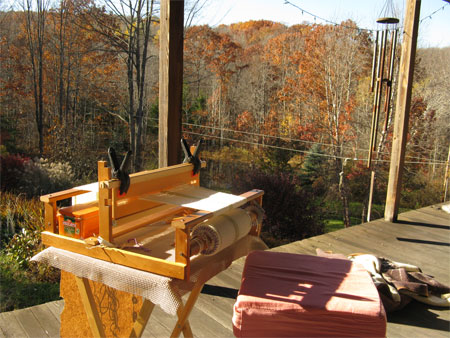
Bring the little rigid heddle (RH) loom out onto the porch to finish off the warp I started at the show last weekend! Certainly one of the beauties of RH looms is their portability. No need to weave inside on days like this!

porch weaving

Before the show I had warped my little LeClerc RH with 160 threads of a lovely, undyed baby alpaca. I clamped two heddles together so I could sett at 20 ends per inch. I was THRILLED that this time when I went to thread two rigid heddles the entire process made complete sense to me. Last time I was baffled, frustrated, and confounded. I had two different written sources & some online help and it still took several hours — thread it, take it out, repeat. This time – no problem. Zip, zip, zip and done.
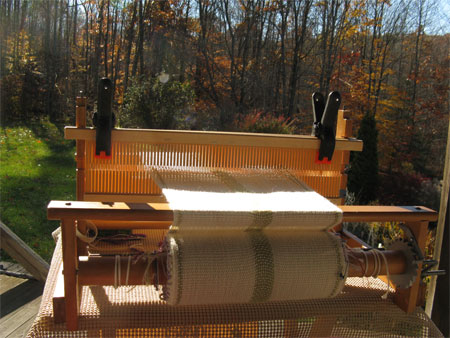
porch weaving 2
(Full disclosure – there was a little problem. I don’t have a heddle stand to hold two heddles in position, so keeping them where I wanted them to be to make threading reasonable required propping up on water glasses and other paraphernalia. Which slipped with some regularity.)

Had it been too hard for my brain to handle on the evening before a show I had a fall back position of using just one heddle with two threads in every slot and every hole. Glad I didn’t have to use it.

Anyway, I got the third and final scarf woven off on my porch, then wet finished and pressed them. I am less than enthralled with some of my design choices but love the baby alpaca and will definitely use it again.

For the first scarf I wove in some bands of varying width using doubled cashmere-silk as the weft. It’s okay. Strikes me too much as prayer-shawl-lite. Not exactly the effect I was hoping for.
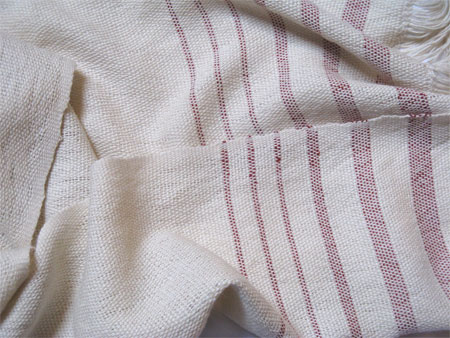
handwoven baby alpaca scarf with cranberry

The second scarf is far more colorful. I used a hand painted wool-silk blend Tammy calls Snow White for the weft. I wove several rows of the alpaca, did a 3-bead leno, and several more rows of alpaca at each end. This is definitely my favorite of the three.

handwoven baby alpaca scarf with Snow White weft

For the third I made a dreadful error in judgement. I decided to replace several of the baby alpaca warp threads with a lovely spring green hand dyed superwash merino. Sounded good in theory. In reality – NOT! Each of those threads (14, as I chose) had to be separately weighted to provide the same tension as the baby alpaca. That wouldn’t have been an overwhelming problem if I was home, but I was at a show. I did not have enough stuff of the correct weight to hang on 14 threads. Or even enough ways to hang the weights I did have. So basically I made a mess late in the day and devised a way to improve it by bringing paper clips and metal washers in with me the next morning. Still looked like a mess, but at least it was functional.

To top this mess off, some of the merino was sort of shredding. Had the dye bath been too strong? Had I hung onto it too long? I didn’t know, but it made another layer of problem.

Third problem – when I cut those 14 replacement warp threads I obviously wasn’t thinking clearly ‘cuz I didn’t make them long enough to weave the planned 76″.

By the time I got to the 60″ I could weave with the merino I’d put in for the warp, I was done. No way was I going to piece in more warp threads for this scarf. So it’s both shorter and less attractive than I’d like. I’ll put a lower-than-usual price tag on it and see if it sells.
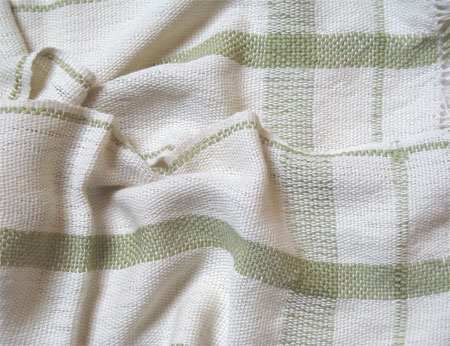
handwoven scarf with baby alpaca & merino

Gotta head back to the loom. I have 4 special orders to weave plus more things I’d like to have on hand for the next show. Plus more bags to make.

Loom ID

It took a week with no clues, and then within 24 hours two women contacted me to identify my little new-old loom. Thanks here to weaver Paula who sent me an email, and second to weaver Wendy who commented on my original post, for letting me know that I am now the proud owner of a Missouri Loom.

Once I had that name, I went online to see what I could find, and if I could confirm the ID. I found a smattering of photos, the majority on Ravelry. While my loom had a few minor details to the Ravelry loom, most things were identical – like the slit in the castle, the 3 pegs for the beater, the shape of the side piece & the fact that it was made from plywood. All three are pretty distinctive.

Look at a more complete label…
Missouri loom label

And my label…
loom tag
While they may not look that similar in the photos, you’ll have to trust me that the little bits of label left on my loom are the same as the Missouri loom label. That was one of my locks on confirmation.

More googling led me to other photos that showed my levers exactly, providing final confirmation.

Then, lo and behold, I found Janet at The Weaver’s Friend. They have a copy of the original manual for this loom! Needless to say, my check went in the mail on that very day.

I can’t wait to get it, in all its 13-page glory!

The loom needs lots of work – new cords (I have purchased cord that MAY work), new apron cloth/straps & cords, new reed, plus tons of cleaning & waxing. I still think I got a good price, and that this little baby will be a gem for me.

I’ll keep you posted.

2012 Victorian Christmas Ornaments

As planned, for the past two weeks I’ve focused most of my time on creating new Victorian Christmas ornaments. I made four new ones, which doesn’t seem like many till you realize that each one is individually designed, meaning that many hours go into working out the number of beads in each section, the order of beads, the colors & sizes, etc., etc., etc.

I’ll show them to you in their order of creation.

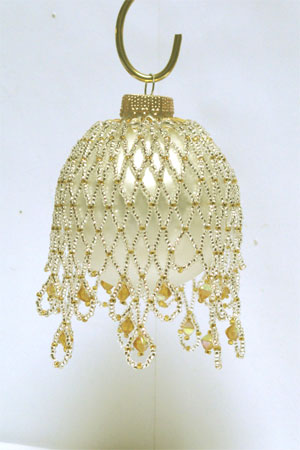
First is a simple netting pattern of silver & gold beads.
silver & gold Victorian Christmas ornament

I had started this ornament as a demonstration at a show back in May & hadn’t touched it since then, so first I had to figure out where I was. Immediately I found a few beading errors I’d made in May, so I had to take a bunch out to fix those mistakes. I’ve done a bunch of netting, so once I got those errors fixed, I was off and running.

Hah! I got about 3/4 of the ornament done, only to try it on the glass ball one more time and decide that it was too full. I had planned for 8 of the longest drops and that would be just too many. The beads wouldn’t hang right and look good. So I had to take EVERYTHING apart and start again from the very beginning to reconfigure it for 7 of the longest drops.

Hours wasted.

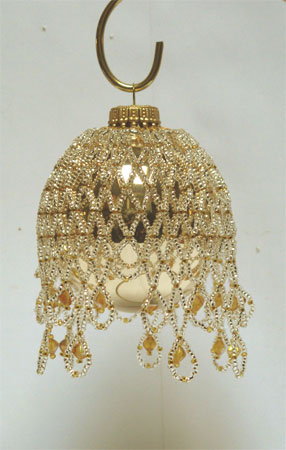
One of the things I really like about my Victorian ornaments is how different they can look when you put the cover on a different glass globe. From a matte silver ball to a shiny gold ball, the look is probably more different in real life than in the photo. And if you use a dark red ball, for instance — completely new look.
silver on gold Victorian Christmas ornament

Next I went to a variation on another style I’ve done before.

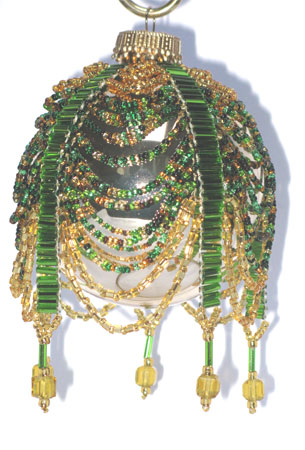
green & gold Victorian Christmas ornament

This one actually went without a hitch. I like the ‘variegated’ strands mixed in with the solid gold strands of the drapes, and the contrast of the roundness of the overall ornament with the squareness of those bottom dangles.

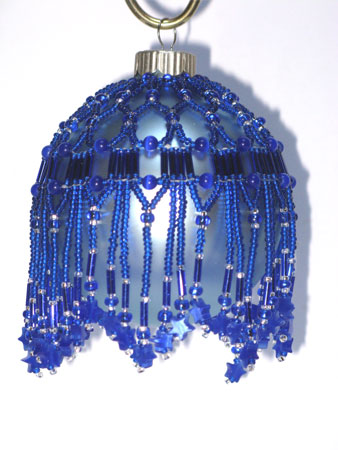
Ok, so that went so well, I have my patience back to try a new pattern. A combination of ladders (like the green bugle beads on the second ornament) and netting (like the first), plus a bunch of stars to dangle from the bottom.

First I started with the netting and tried to add the ladders. Not the way to go. Then I created the ladders and tried to connect them to my previously-created netting. Nada. So simply put that netting aside and start again with the ladders. (Can you see the hours building up again?) When all was said & done, I’m happy with the design.

blue stars Victorian Christmas ornament

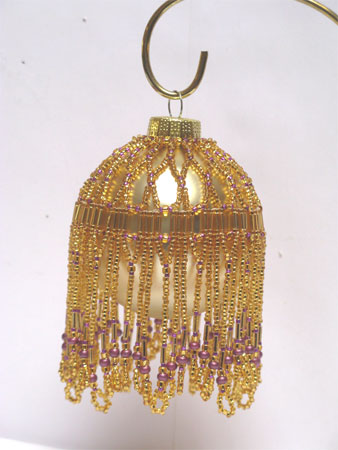
So because I was happy with the general design, I decided to try a modification that would make it even more rich, more over-the-top. That, after all, was my goal for these four ornaments, and I achieved it to differing degrees with the first three. This last one would be the most lavish. I decided on mostly gold with purple accents.

gold & purple Victorian Christmas ornament

I really like the length of the dangles, and the loop on the bottom. I’m quite happy with this ornament.

My plan is to have two completely different types of demos for this weekend’s Well Crafted Weekend at the Roycroft in East Aurora — weaving with fiber and bead weaving.

I’ve got my rigid heddle loom all set up still from Letchworth, so no time involved in that end. The reason for creating these Victorian Christmas ornaments was to have something fancy to show what I can do — most of my existing ornaments are what I consider to be simple.

So to have an ornament that I can work on while people watch, I had to have it started. There’s no way I can start with people watching – it would be WAY too boring to watch me thread beads, try them on the glass ball, then take them out. Repeatedly.

No problem. Do some netting (easiest to do while distracted).

I chose some purple metallic beads with off-white pearl accents. Figured based on the silver & gold experience that I’d start by planning for seven of the longest drops, not eight – don’t make that mistake again! I wanted the drops to be longer than on the silver & gold, so simply add enough more segments to do that.

Yeah. I took those three rows in and out four times!

The first time I’d used actual small pearls for the intersections, but I thought they looked to big compared to the purple seed beads.

The second time I decided that I hated the larger pearls I’d incorporated into the bottom loops.

Third time I decided that it would all look better with only 5 beads between each of the intersections instead of the 6 I’d used.

See why I couldn’t do this part with people watching? And why it takes so many hours to make a single ornament? I have easily four hours into this one just to get the first three rows in. Now that I have that design work done I know I can finish it relatively quickly — at least I could if I wasn’t doing it as a demonstration — but relatively quickly probably means another 3 hours plus.

I didn’t take pictures of what I have done so far — I’ll show you when it’s actually done. May be months from now!

Your turn: do you spend lots of time putting things together and then taking them apart?

New Old Loom

I picked up a little convertible table/floor loom today. Like my other 3 looms (4H counterbalance, 8H Macomber, and rigid heddle), I picked it up for a song, and it hasn’t been used in decades. It needs work, quite a bit of it, to bring it back to life. My goal is to make it be a terrific loom to bring to shows to demonstrate. Or to workshops.

First I have to learn a bit more about it. So I’m posting a mess of photos here and a few on Weavolution in hopes that someone can give me some info & pointers. Someone will recognize this loom, I’m sure of it.

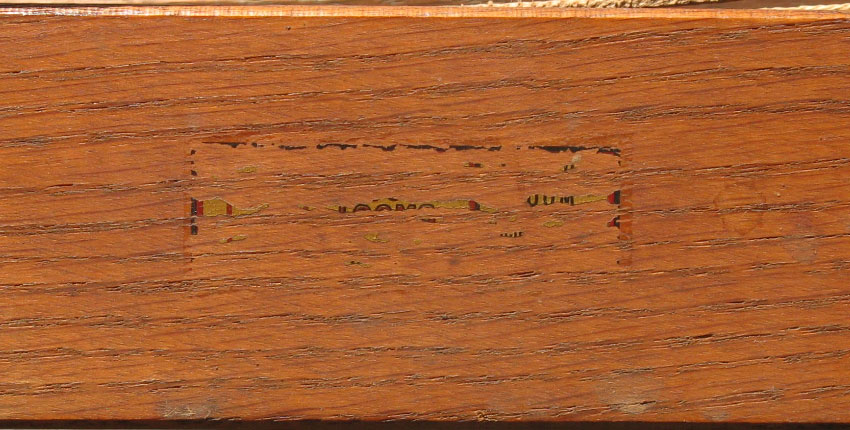
This is all that’s left of the original label on the castle. If you look closely you can make out where the word LOOM was, but I’ll be darned if I know who the maker was.
loom tag

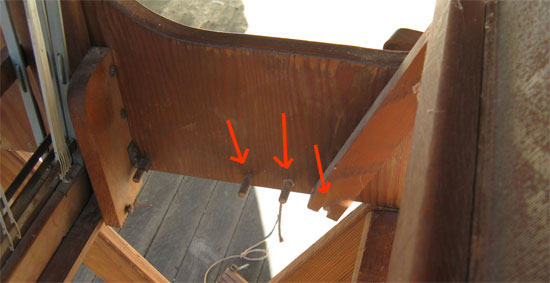
It has some interesting features. For instance, you can see that there are 3 pegs for beater position. Allows for the best positioning of beater to fell line.
beater pegs

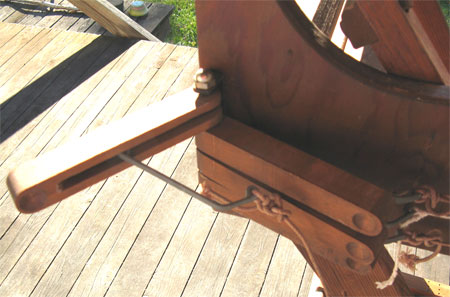
If used as a table loom, the levers are on the side, and have a sweet little indent on the tip of each lever.
side levers closed

And here’s a shot of one lever open.
side lever open

Here’s a really bad shot of the lamms, not attached, obviously, for when it’s used as a floor loom. When the lamms are hooked up, they are IMMEDIATELY beneath the castle. That seemed odd to me, but it’s appears that it’s correct based on some hooks on the lamms and bolts on the castle frame. Didn’t get a shot of either, but I can if that’d help anyone with identification.
lamms on floor

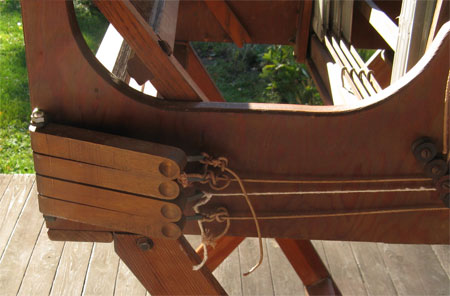
The lamms hook onto these loops with clips on the lamm cords.
where lamms hook

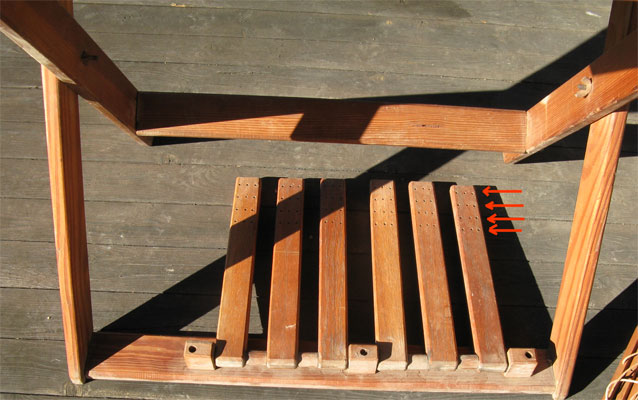
The 6 treadles are each drilled with four rows of three holes each. Lots of tie up possibilities.
treadle tie holes

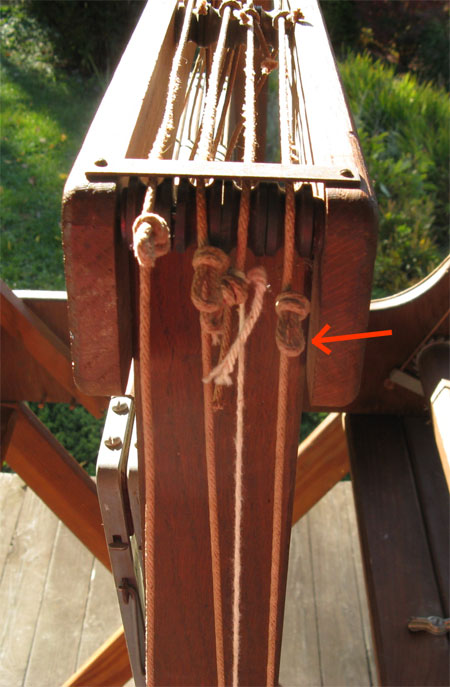
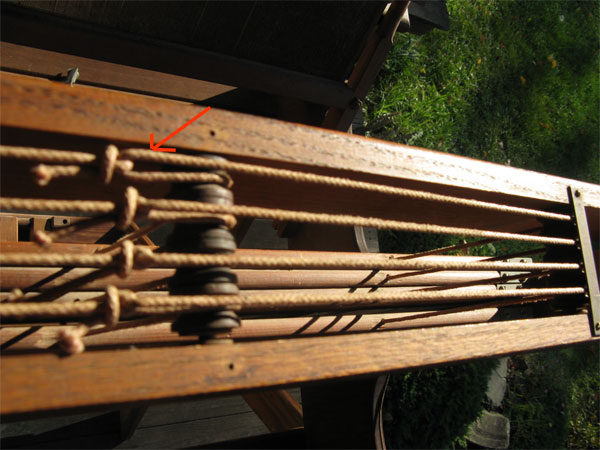
Here’s a shot of the top of the loom. Interestingly, they have a loop & knot after the cord passes over the second set of wooden rollers (probably not the correct terminology).
top knots

It seems to me that the castle is meant to fold. Otherwise there wouldn’t be these slits and wing nuts. The castle also sits on pegs.
side slit outer

But I haven’t been able to make it fold. I took the bolts & nuts all the way out and I could sure lift the castle up and move it, but couldn’t see a way that it could move in a way that would allow the bolt to be in place.

So do you know this little sweetie? If so, I’d love to hear from you. Even if you don’t, you might have some experience that’d give you insights into such things as cleaning. Start with Murphys Oil Soap, let it dry well & go to Danish Oil? Cord replacement – Texsolv? Other?

Thanks for your help!

Unpredictable

sumac in autumn

As usual, my thoughts about what the customers at the Letchworth Arts & Crafts Festival were completely wrong. Maybe I ought to decide what I think my customers will like and then make exactly the opposite thing, since that’s about how accurate I usually am. (What a grammatically poor sentence!)

I made mug rugs, more bookmarks, magnets, and cards specifically for this show, thinking that the customers wanted some lower-price-point options. Hah! I sold 10 bookmarks – less than I’v sold at almost any other show. 3 mug rugs, 3 magnets, and no cards. I did, however, have my 3rd largest show ever in terms of numbers of scarves & shawls sold. Just goes to show…I know nothing.

I spent today doing all those post-show necessities. Processing the credit card charges. Preparing a bank deposit. Returning the rental van. Entering sales in the computer. And then, just for fun, laying out every single piece of my tent – top, sides, and awnings – to dry, since all were damp (some wet) when I closed up on Monday. This is my last show of the season & I can’t have things getting moldy or mildewy while they sit around all winter.

So I spent a bunch of the afternoon doing nothing much. Reading a book. Responding to email. Making cauliflower curry. Reading some more.

In 2 weeks I’ll take part in A Well Crafted Weekend with some of my fellow Roycroft Artisans. Focus on demonstrations with some sales on the side. I plan to demo both loom weaving and bead weaving. Between now & then I’m going to focus on making a few over-the-top beaded ornament covers. I do love making them, don’t have any fancy-fancy ones now, and would like to have them for my November & December shows, so it all fits together.

Right now it’s off to a library board meeting.